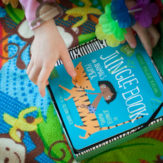
LESS THAN ORGANIZED…
I like to think of myself as a very organized, forward-thinking person. Sometimes I even excel at being that person. When I’m organized and on top of things, I feel so much more calm and centered. Sometimes I am the mom at the park who has the spare change of clothes, extra socks, and hand sanitizer in my “emergency” bin in the car. Sometimes I am at the grocery store with my perfectly curated list and I actually know where my debit card is! Sometimes my house is tidy, my thank you cards are stamped and sent, and our drawers are full of clean clothes.
In my last recipe post I was practically begging for summer to be over and, after more thought on the topic, I’ve realized that part of why I feel so ready for fall is that in fall I’m so much more organized. The “Summer Me” does not know how to stay organized, in fact, “Summer Me” is kind of a disaster. I’m the mom in the park who notices two minutes in that her three-year-old has forgotten to put on important undergarments. In summer I am the person who realizes after their groceries have been rung up that they forgot their wallet. In the summer our house is tracked with dirt from the garden, the “to do” boxes go unchecked, our laundry grows into mountains, and her kids often go a day or two before we stopped to question when their last proper bath was. I do enjoy elements of these wild days, but by mid-August I’m ready to get things back in order.
I often wish I was either more organized or more laid-back. I’ve been working on being both aspects of life; trying to get on top of things while trying to let go of expectations and relax. Where I am on the spectrum or organization varies depending on the season, at the moment I’m leaning towards “not at all”. As much as I want to be carefree, I rely on organizations and routine to hold “it” together. When I’m organized, I am more laid back… sadly, this doesn’t seem to work in reverse, or so summer keeps reminding me.
My cooking also varies based on where I’m at in the spectrum between organized and… less than organized. In the winter, when I tend to be very organized, I channel my inner Julia Child – cooking and baking with more precision, time and effort. In the summer when I am feeling frazzled and busy, my recipes tend to be simple and tossed together, often without much premeditation or structure.
.jpg) PIN PIN
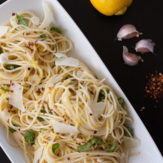
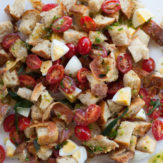
This cold pasta salad came about when one of those recent frazzled, busy days. We had taken the kids to the swimming pool and came home hungry and wiped out in the way that swimming pools wipe you out. As Kyle quickly bathed the babies, I whipped through the kitchen throwing together what would turn out to become a new favorite summer meal.
.jpg) PIN PIN.jpg) PINI quickly cooked and cooled some penne pasta, whisked together a tart Champagne vinaigrette, sliced and diced a ripe peach, shredded some left-over chicken breast, added some fresh tarragon and pungent Gorgonzola and miraculously had a made-from-scratch dinner on the table before the girls had finished their bath! These kind of meals are my saving grace in summer. I don’t pull them off often enough, but they serve as a reminder that, although we may have had way too many slapped together peanut butter and jelly sandwiches for dinner this summer, I still have the hope of regaining my formerly organized life. If not this month, than maybe next month. PINI quickly cooked and cooled some penne pasta, whisked together a tart Champagne vinaigrette, sliced and diced a ripe peach, shredded some left-over chicken breast, added some fresh tarragon and pungent Gorgonzola and miraculously had a made-from-scratch dinner on the table before the girls had finished their bath! These kind of meals are my saving grace in summer. I don’t pull them off often enough, but they serve as a reminder that, although we may have had way too many slapped together peanut butter and jelly sandwiches for dinner this summer, I still have the hope of regaining my formerly organized life. If not this month, than maybe next month.
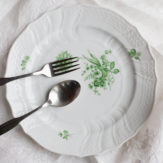
 PINCOLD PENNE WITH ROASTED CHICKEN, PEACHES, GORGONZOLA AND TARRAGON PINCOLD PENNE WITH ROASTED CHICKEN, PEACHES, GORGONZOLA AND TARRAGON
Ingredients.
1 lb. penne pasta
2 cups shredded roasted chicken breast (my roasting directions below)
2 large, ripe peaches, pitted, and diced
4 oz gorgonzola cheese, crumbled
1/4 cup Champagne vinegar
3/4 cup extra virgin olive oil
1 teaspoon dijon mustard
kosher salt
freshly ground black pepper
1 tablespoon minced, fresh tarragon
small handful fresh tarragon (whole leaves)
Directions.
If you don’t have left-over chicken on hand you can easily roast some. I buy bone-in, skin-on breasts. Preheat the oven to 375˚F, drizzle the breasts with olive oil, season with lots of salt and freshly ground black pepper. Roast for about 45 minutes or until the internal temperature is 165˚. Allow the chicken to cool before discarding the skin and bones and shredding the chicken.
Bring a large pot of salted water to a boil, add the penne, cook until al dente, drain, and rinse with cold water until cooled. Set aside.
In a medium bowl whisk together the minced tarragon, dijon mustard, and the champagne vinegar until combined. Slowly drizzle in the olive oil, while whisking, until the vinaigrette is well combined. Season to taste with salt and pepper.
In a large bowl gently toss together the pasta, chicken and peaches, and transfer to a large serving dish. Top with the gorgonzola, the fresh tarragon, and the vinaigrette. Finish with a few turns of freshly ground black pepper.
Enjoy!
PRINTABLE RECIPE.
COLD PENNE WITH ROASTED CHICKEN, PEACHES, GORGONZOLA AND TARRAGON
Kyle and I are still pretty new to this whole canning thing but we love it! We have already done lots this year: spiced pickled carrots, dilly beans, chile dilly beans, tarragon beans, and dill pickle slices. Tonight we are gearing up for pickle round two of the season. We will be making more dill pickle slices, bread and butter pickle slices, and pickled red onions… I bet our friends and family can guess what they’ll be getting for Christmas this year! What’s really amazing this year as that everything, even the garlic and dill, are from our garden!
Pickling is easy because it uses high acid vinegars which means it can be done with a hot water bath method (as opposed to pressure canning). You need very little in the way of supplies to get started. I’ve been asked about this a number of times so I thought I’d put together a simple checklist of what you need to get started with canning and pickling! These are the books and supplies we bought to get going…
PICKLING BASICS:
Canning Pot with Rack
Kitchen Scale
Jar Lifter
Mandonline
Canning Funnel
Tattler ReUsable Lids (optional)
Magnetic Lid Wand
Ball Jars and Lids (available at most stores)
BOOKS:
The Pickled Pantry
The Preservation Kitchen
Canning for a New Generation
Food in Jars
The Art of Fermentation (this is more of theory book that Kyle is using)
You will also need a few big bowls (for holding cut up veggies), a big pot with a lid (for your pickling solution), and lots of absorbent kitchen towels that you don’t mind getting stained!
In total the whole basic pickling/canning set up will cost around $120 for supplies (not including the towels, jars, and bowls/pots), and about $85 for the books but you could get started with one (we love The Pickled Pantry).
Let me know if you have any questions and I’ll try to answer them! Happy canning!
PINPIN
PINPINPIN
Save
Save
WISH IT AWAY…
I’m trying not to wish the summer away, really I am. But if this heat wave continues much longer I’m going to stop pretending to enjoy these long summer days and go ahead and admit to you that I can’t wait for sweaters, hot toddys, soup, quiet evenings, fall harvesting, braised vegetables, winter squash, chocolate chip cookies, hot cocoa, feet pajamas, fleece sheets, rereading Harry Potter, and rain. It’s only the 9th of August, so I’m going to try to enjoy what’s left of summer (while secretly counting down the days until September).
I can see how that promise about trying to enjoy summer seems disingenuous when preceded by that list of why Fall is so fabulous so I’ll give you five reasons why I love summer:
01. Summer evening light…
PIN02. Summer mornings in the garden…
PIN
03. Classic Micheladas…
PIN04. Spicy Micheladas…
PIN05. Sueros…
PIN
Today is Saturday, and it’s relatively cool out this morning. My goal for the day is to have fun… something we haven’t had nearly enough of these past few weeks. I’d also love to get our bedroom clean and organized. It’s current state does not exactly fit that description. If we keep our bedroom and master bath clean and tidy, even if the rest of the house is falling apart and we will eventually have to rent a pressure washer to clean the floors, we have somewhere peaceful to start and finish our busy day.
I plan to make myself one of these wonderful Micheladas and get cleaning. I am wearing my bandanna and will definitely flex my bicep in the hallway mirror on my way to clean not unlike Rosie the Riveter. Sometimes it feels like I need that kind of persona to take over my tired body in order to accomplish goals like: Keep Room Clean. Come to think of it, I’m pretty sure Rosie would have liked one of these Micheladas. Probably the Spicy Michelada, or maybe the Classic version. My personal favorite is the Suero.
Last summer, after Lulu was born, and I was probably busy writing blog posts about it being too damn hot, I made Sueros. I first learned about Sueros when my sister was living in Oaxaca. My mom went to visit her and came back to report that Oaxaca, Mexico had the best summer beverage. A Suero is simple: salted rim, lots of lime juice, ice, Mexican lager. I added a slice of fresh jalepeño to give it a little kick, and some lime zest to the salted rim for more a more intense flavor. Fun fact: Suero translates to a medical serum, like a restorative IV.
Micheladas, so far as I can tell, has a million variations. I made two versions: one with tomato juice and spices like Old Bay and celery salt, kind of like a Bloody Mary; and another that skips the tomato juice but has lots of hot sauce added. All three of these versions are refreshing, flavorful, and certainly make these long summer days more enjoyable.
PINPINCLASSIC MICHELADA: the classic Michelada is made with tomato juice, hot sauce, and spices. Sometimes called a Bloody Beer, it’s the Mexican version of the Bloody Mary.
Ingredients.
10 oz. mexican lager (Carona, Pacifico, Tecate)
1/2 teaspoon kosher salt
1/4 teaspoon celery salt
1/4 teaspoon Old Bay seasoning
2 tablespoons lime juice
1 1/2 oz. tomato juice
1/4 teaspoon soy sauce
1/2 teaspoon Worcestershire sauce
a few dashes Tabasco hot sauce
lime wedge
ice
Directions.
Mix together the kosher salt, celery salt and Old Bay seasoning. Rub a bit of lime around the rim of your glass and coat the rim in the mixture. Fill the glass with a handful of ice cubes.
In a separate glass mix together the tomato juice, lime juice, soy sauce, Worcestershire sauce and Tobasco. Pour the mixture over the ice. Add 10 oz. of beer. Stir to combine. Garnish with a lime wedge and a pinch of the rim seasoning.
PIN
SPICY MICHELADA: this spicy version skips the tomato juice but adds a kick with a flavorful hot sauce. It’s refreshing and spicy.
Ingredients.
10 oz. mexican lager (Carona, Pacifico, Tecate)
1/2 oz. lime juice
1/2 teaspoon Cholula Hot Sauce
1/4 teaspoon soy sauce
1/2 teaspoon Worcestershire sauce
kosher salt
celery salt
lime wheel
ice
Directions.
Rub a bit of lime around the rim of your glass and coat the rim with kosher salt. Fill the glass with a handful of ice cubes.
In a separate glass mix together the lime juice, soy sauce, Worcestershire sauce and Cholula. Pour the mixture over the ice. Add 10 oz. of beer. Stir to combine. Garnish with a lime wedge and a pinch of celery salt.
PINSUERO: this isn’t exactly a Michelada but it’s in the same family. Sueros are popular in Oaxaca, Mexico… and our house. I add a little jalepeño for a bit of heat and lime zest on the rim for more flavor.
Ingredients.
8 oz. mexican lager (Carona, Pacifico, Tecate)
1-2 oz. lime juice (depending on how tart you’d like it)
1/2 teaspoon kosher salt
zest from 1/2 lime
lime wheel
1 slice fresh jalepeño
ice
Directions.
Mix together the kosher salt and lime zest. Rub a bit of lime around the rim of your glass and coat the rim in the mixture. Fill the glass with a handful of ice cubes. Pour the lime juice and beer into the glass. Garnish with a lime wheel and slice of jalepeño.
PRINTABLE RECIPES.
MICHELADA SUERO RECIPES
HANDY SKILLS…
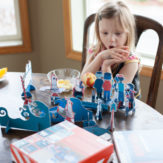
Kyle spent most of the Sunday before last working on his car. He had to change the boot (?) because it was burning grease (?), and change the oil and filter. I’m a little fuzzy on the details. It’s always impressive to me when he heads out to the garage in coveralls, grabs the correct tools, and fixes something that would have cost lots of money at a garage. He learned how to work on cars from his Dad, and I hope some day our girls are interested in learning some of what Kyle knows about cars.
My Dad is also pretty skilled in the car-fixing department; when I was in high school he gave me a detailed lesson on how to change a tire. I vividly remember standing in the gravel of his driveway while he walked me through the process. Sadly, I don’t think I retained the lesson. But still, maybe Kyle will be able to teach the girls a thing or two. Although, amongst the many toys that G recently inherited was a pristine workbench with wooden screws and tools. Gigi did use the wrench once… to try to reattach a doll’s head to it’s body. The workbench is now next door at her best friend’s house; he came to play with it once and wouldn’t stop talking about it. It’s getting used a lot more now.
So, maybe the ladies in our house need to put a little effort into learning some handy skills. I’m pretty sure could change a tire if I needed to, and I mostly know how to jump start a car. I definitely know how to call AAA, and how to YouTube videos of how to change a tire and jump start a car battery. I’m married to a pretty handy man so there are a lot of things I default to him… not that there’s any excuse for not knowing the basics of getting a car back on it’s feet. Note to self: have Kyle teach me how to change a tire and jump start a car.
I may not be good at certain “manly” things (though I’m going to make an effort to learn some basics), like car repair and knowing which kind of wrench is which, but I excel at grilling. Really, you could argue that knowing how to grill a steak properly is just as important as knowing how to jump start a car… at least it is in my world. Kyle handles the long term grilling and smoking: ribs, brisket, and the like. But when it comes basic, day to day grilling, I’m your girl.
I can grill a steak or fish close to perfectly almost every time, and I can flip onions on the grill and barely lose a ring. I’d never really thought about grilling green beans before but ’tis the season for grilling and it’s been too hot to turn on the oven. Besides, we’ve had approximately one million green beans to deal with. We have been them like crazy the past couple of weeks. I probably should have followed The Vegetable Gardner’s Bible’s instructions and planted them in succession!
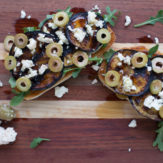
PINI wanted to char the beans more than anything so I quickly blanched the green beans and made sure the grill was really hot before I tossed them on. To counter the smokey char I whipped up a bowl of my new favorite dressing; a creamy miso-based, toasted sesame sauce that is sweet and salty and delicious. This recipe takes only a few minutes to throw together and the beans can be blanched well in advanced, which comes in handy if you have a busy day, friends coming over for dinner, or the temperature is set to soar in the afternoon. I served these alongside grilled kale and firm tofu that I drained and quickly marinated with a bit of toasted sesame oil, soy sauce, and agave. They are also great served alongside grilled chicken or grilled flank steak!
PINPINPINCHARRED GREEN BEANS WITH SESAME MISO DRESSING
Ingredients.
1 lb green beans, ends trimmed
salt
vegetable or canola oil
1/2 cup mayonnaise
1 tablespoon toasted sesame oil
1 teaspoon mirin
2 teaspoons rice wine vinegar
2 teaspoons soy sauce
1 1/2 teaspoons red miso paste
toasted sesame seeds
Directions.
Prepare and ice bath and bring a large pot of salted water to a boil. Toss the green beans into the boiling water and cook for 2 minutes, just until their color brightens to a vibrant green. Drain and submerge them in the ice bath.
In a large bowl whisk together the mayonnaise, sesame oil, mirin, rice wine vinegar, soy sauce and miso paste until well combined. Set aside.
Preheat your grill to high.
Drain the green beans and transfer them to a bowl. Toss with a drizzle of vegetable oil and grill them on high heat until they char and have some nice grill marks. Toss carefully with tongs. It’s easy for them to slip through the grate so keep them perpendicular on the grill… you could also use a grill basket if you have one but they might not char quite as well.
Remove the green beans from the grill, drizzle with lots of dressing and toasted sesame seeds. Enjoy immediately.
PRINTABLE RECIPE.
CHARRED GREEN BEANS WITH SESAME MISO DRESSING
THE PEACHES ARE RIPE…
Last night, we got Gigi up out of bed to see the sunset. The wind whipped around, the sky was pink, and G held tight to Kyle while she jabbered on and on about the shape of the moon. I love little moments like that. It helped to make up for the fact that yesterday was a loooooong day that ended with me feeding the kids oatmeal for dinner… I actually fed Lulu her dinner while she sat in the bathtub because it was the only thing that got her to stop crying.
The week has been a flurry of long work days for Kyle, deadlines for me, teething for Lulu, and serious paper crown making for Gigi. We had pizza for dinner twice this week, and more Thai Salads, and cold pasta dishes. We spent last weekend on the Washington coast, the evidence of which (unpacked suitcases, loads of laundry, and sandy beach bags) is still lying about. The photo below is from our weekend.
PINThis week has been an “Is it Friday yet?” kind of week. Finally, today, it is! It’s balmy and warm today; the air feels indicative of thunderstorm weather. It’s how I imagine the air in the South must feel – although I haven’t spent any time there, other than four days at my friend’s wedding in New Orleans. Since the weather has been muggy, and the peaches are ripe, I’ve been playing around making bourbon-based, peach cocktails the past couple of weeks.
These boozy-peach drinks are decidedly summery, and I like to imagine that I’m living on old, damp, Southern land while I pick peaches from our neighbors peach tree. We have some horses, and pigs, and the air is thick and I have some girlfriends over for cocktail hour. I reach up into the peach tree, gently squeezing each peach to find the tenderest ones, then I pluck them from the branch and gently settle them in my basket. When I’m back in my kitchen, I whip them through the blender and pour jiggers of peach purée and bourbon over ice – garnished with mint, naturally.
PIN
Today, I’m hoping to enjoy one of these while reading a book in the garden while the kids nap. It won’t quite be “cocktail hour” during their nap, but after the week I’ve had, 1pm seems like a decent hour for a drink. A little reading time in the garden seems like a reasonable request, but we’ll see where the day takes us. Hopefully we won’t end up with a mad baby eating oatmeal in the bath. But, if we do, at least I’ll have bourbon in hand and on hand for those flared up gums. This recipe makes four cocktails… anyone want to join me?
PINPINBOURBON PEACH COCKTAILS WITH GINGER AND MINT
Ingredients.
1 1/2 cup diced ripe peaches, stone discarded
1/2 cup water
1/4 cup granulated sugar
club soda
bourbon
fresh ginger root
1/2 lemon, juiced
fresh mint
Directions.
Combine the diced peaches, water, and sugar in a blender and whiz together to combine.
Set out four cocktail glasses and place the following in each glass: 2 1/2 oz peach pureé, two very thin slices of fresh ginger (no need to peel it), 1/2 tsp fresh lemon juice, 1 1/2 oz. bourbon, 1 oz club soda. Stir to combine with a spoon, pressing the ginger slices against the side of the glass with your spoon to release the juice. Add ice and garnish with a small sprig of mint.
Enjoy!
Serves 4.
PRINTABLE RECIPE.
BOURBON PEACH COCKTAILS WITH GINGER AND MINT
|


.png)


alma - The funny thing is as I read this I thought you were talking about me. I also “struggle” to stay organized in the summer. I think we may just be having too much fun 🙂 I hope you’re enjoying your summer and this penne looks delicious I will have to try it.
Kacie - Alma, Well, I’m glad it’s not just me! We have been having quite a bit of fun. 😉