Gigi has been the recipient of lots of wonderful, colorful, exciting, new-to-her toys. Our friend’s two daughters recently decided that they were all done with everything fairy/princess/hot pink/baby doll related, so my lucky girl got van-load of dolls and books. It’s been like Christmas in July. G had been loving having all the new things but they came in on top of some drastic reducing and simplifying we have been working on around here. We have a small space and, after a few weeks with the new toys, we talked to G and decided all together that we should offer some of the dolls and things to her friends who are a part of our hand-me-down train.
Some things didn’t make it very far. One of the toys that we inherited was a workbench with wooden screws and tools. I kept it in the house for a few weeks, and Gigi played with it here and there but, as much as I wanted her to want to play with it, she didn’t. She did use the wrench once… to try to reattach a doll’s head to it’s body. The workbench is now next door at her best friend’s house; he came to play with it once and wouldn’t stop talking about it. It’s getting used a lot more.
Normally I would have avoided conflict and just swept through Gigi’s room while she was playing elsewhere, but she’s getting old enough now that it was important for me to have the conversation with her about passing things forward, sharing, donating, and keeping things clean and simple. To my surprise she willingly participated. We went through all of her toys, coloring books, and books. She chose what to give and what to keep, and honestly, she surprised me with her willingness to let things go.
I had been expecting a meltdown or two but she really rose to the occasion, although she did put her foot down on a big singing Ariel doll that I was hoping to pass along. I guess I’ll have to put up with Ariel breathy voice saying, “The human world is so exciting. Will you please show me all the amazing things there are to see?”. Last week I asked her for a big snuggle and she said, “I’m sorry. I got rid of that.” So, I guess she’s getting used to this whole downsizing program.
I’m really proud of her for how willingly she helped to sort and select the things that she loved and wanted to keep, and the things she thought would be okay to pass along to friends, or to donate. Keeping things simple is obviously something that’s important to me and I love that she’s getting to an age where I can start to teach her the value of simplicity.
I believe in simplicity, although I still feel overwhelmed with things. No matter how much we donate I still find more and more to pass forward. It’s all a work in progress. I try to keep lots of things in my life on the simple side, especially my cooking. I don’t push myself too much in the kitchen; I cook things that sound exciting, comforting, and simple. After all, I am the mother of two very active little monkeys, three if you count our much-neglected/much-tortured cat, so keeping things on the easier side of gourmet is important.
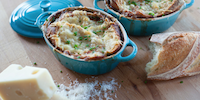
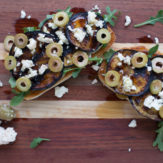
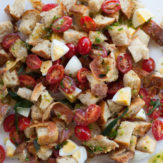
PINI recently read Molly Wizenberg’s new book, Delancey. It has a great collection of simple meals that still have something special. I have been too busy re-watching Band of Brothers, and subsequently losing sleep due to stress, to have whipped up many of her recipes from this book but one recipe I’ve made and loved was her Chilled Peaches in Wine. Talk about simplicity! All you need is a few fresh peaches, bright wine, and a bit of sugar. I took some liberties with the recipe by using rosé, and tossing a few sprigs of fresh thyme in with the peaches while they marinated. I decided to enjoy these peaches on slices of toast that were smeared with a lot mascarpone cheese. No matter what kind of wine you use, or how you present the finished product, this is a very simple dessert.
PINPINPINPINROSE CHILLED PEACH TARTINES WITH MASCARPONE AND THYME Adapted from Molly Wizenberg’s recipe for Chilled Peaches in Wine
Ingredients.
4 large, ripe peaches, very thinly sliced
1/4 cup granulated sugar
2 cups rosé wine
3 sprigs fresh thyme, plus more for garnishing
french bread, thinly sliced
mascarpone cheese
Directions.
Place your peaches and sugar in a large bowl. Roll the thyme sprigs between your palms to release some flavor before adding them to the bowl. Gently toss the sliced peaches and thyme sprigs with the sugar. Add the wine and gently toss again. Cover the bowl and refrigerate for 12-24 hours.
When you’re ready to serve the peaches, toast your bread slices. Allow them to cool for a minute or two before smearing them with a generous amount of mascarpone cheese. Lightly drain the peaches (it’s okay if they’re still dripping with boozy syrup) before topping the toasts with them. Garnish with a little fresh thyme and about a teaspoon of the syrup.
Kaylan-The recipe looks delicious and beautiful photos! That first one of you and the girls and kitty is just so perfect. Simplicity…something I am always striving for and can’t ever seem to achieve. Loved hearing your reflections on it.ReplyCancel
kacieblogs@gmail.com-Always a work in progress, friend! I’m so excited for your move and will be thinking of you while you manage the next few months on your own! xoxoReplyCancel
The girls have been cracking us up and driving us crazy in equal measure. They are playing together more and more lately which is resulting in a lot more giggles around here (as well as a lot more accidental head bonks). They play really well together most of the time, especially in their little Ikea kitchen, probably because there is plenty of “food” to go around. Gigi loves pretending to be a chef or waitress and takes orders from everyone before usually responding, “Oh, I’m sorry. We don’t have that.” Apparently she’s one of those chefs who just serves you what they want to, and you can take it or leave it.
PINThe girls adore one another. They hold hands in the car, chase each other around the house, and are starting to have funny conversations. Gigi takes great pleasure in making her baby sister laugh, telling on her for eating markers, and teaching her things (like screaming for fun, climbing, and new words). There are, of course, plenty of times when Gigi asks us to remove Lulu from her “zone”, or closes her baby sis out of her room; like early in the morning when she hears Lulu crawling down the hall towards her room and she hops out of bed, slams her door, and goes back to sleep! But, they are really finding their stride as two toddlers, and it’s a joy to see.
PINLulu has learned, and perfected one of these new words. I put together this little video of Lulu proving her mastery of it… it’s just a phase, right?
Rebeka-This was exactly what I needed this morning, SO cute! Thanks for sharing!!!ReplyCancel
Linnea-Kacie, this video made me laugh so hard!!! Love it 🙂 I feel like I’m getting a glimpse into my future. Lulu is such a clever sweetheart.ReplyCancel
Christine -I found you through Instagram and am thrilled that I did! This is an adorable post. As a long-time nanny, I can envision both of your girls’ current phases: the literal-imaginary waitressing (saying, “Oh, we don’t have that,” to everything that’s not in the play kitchen) as well as the incessant “no”-ing. When I first encountered a baby in the no-no-no phase, I thought that she was demonstrating a newly acquired skill of stating her opinion (“Do you like your nanny?” “No!”), but then I explored it further by asking an exhaustive list of questions, like you did in your video, and discovered that it is, indeed, just a phase. 🙂ReplyCancel
Kacie-Christine,
Thank you for the sweet comment. I also nannied for 10+ years! Helps me get through some of the less cute phases. 😉ReplyCancel
Toni Posey -I never knew I could love the word “NO” so much! Thanks Lulu!!!ReplyCancel
It’s amazing what a good, relaxing, and cool weekend can do for a person’s spirits. Armed with a list from my physical therapist of a dozen new exercises to do, and a fancy new collection of elastic resistance bands, I headed into the weekend determined to turn my low mood around by being active and proactive. I feel motivated and excited to rebuild my body in a such a way that it can properly support itself and I can resume my formerly active lifestyle. My clean MRI has freed me to start moving again. There’s something about taking a (literal) active approach to all of this that makes me feel better about everything.
I tend to be an all or nothing person… make that an all or nothing person who is striving to live a more balanced existence. Last week, as I shared, I hardly cooked a thing, I watched a movies during the girls’ nap time (including Haute Cuisine, which I highly recommend), slacked on emails, etc. It was understandable given the amount of discomfort I was experiencing from the cortisone injection and the 90 degree heat. This weekend things cooled down and my aches were diminished a bit, so true to form, I peeled myself up from the couch and got cooking again.
On Sunday, I steamed sliced carrots and green beans; roasted sliced beets, butternuts squash, and sweet potatoes. Then I froze all the vegetables in single layers on baking sheets and transferred them into little containers filled with a variety of frozen finger-food-sized vegetables for Lulu. I can quickly defrost them, along with some frozen peas or corn, and put give it to her with some buttered bread, shredded chicken, or slices of cheese for healthy lunches or early dinners.
Yesterday, I set out with the intention of making a couple of batches of homemade macaroni and cheese with roasted chicken, and somehow ended up making eight batches! I’m not sure what happened but I just kept cooking and cooking, and a couple hours, nine quarts of cheese sauce, six roasted chicken breasts, and seven pounds of pasta later and there I was with tons of macaroni and cheese for the freezer. I made so much macaroni and cheese that we ended up going to the neighbors house for tacos because the idea of eating mac and cheese for dinner was just too much.
I love making Macaroni and Cheese from scratch because, while I’m not against a box of it from time to time, I prefer to eat, and feed to my kids, food that I’ve made from scratch. It’s my thing. I like to toss in some chicken breast that I’ve roasted and shredded for some extra protein. I freeze whole batches in a casserole dish, but I also make a batch or two to freeze in smaller portions. I line a couple baking sheets with parchment paper and scoop out enough for the kids, then I freeze the portions. Once they’re frozen they can be transferred to a Ziploc bag and kept in the freezer for easy, fast, made-from-scratch lunches for the girls (or me). I posted the photo below on Instagram yesterday and everyone declared that I was brilliant and a genius – which also has a way of boosting one’s morale.
PIN
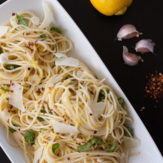
My big cooking and freezing and storing binges usually come on the heels of a week or two of no cooking (for various reasons) or a vacation. Something comes over me and I make and bake my way back to normalcy. So what if my normal is someone else’s crazy? Full disclosure: I also made a double batch of granola… and a quadruple batch of buttermilk pancakes to freeze… and chicken stock. On the tail end of one of my ridiculous cooking days, or weekends, I usually end up making something really simple for dinner (unless my best friend/next door neighbor steps in and saves me). One of the simplest, and most delicious dinners in my repertoire is Grilled Kale Caesar Salad.
PINPINWe make Grilled Kale Caesar Salad a couple times a week in the summers, especially during the time when kale in our garden is in abundance. The kale is washed, stripped from the stalk, roughly torn, tossed with olive oil and grilled until wilted and charred. Then it’s simply tossed with a fresh, lemony Caesar Salad dressing, some peppery croûtons, and a decadent amount of shaved Parmesan. The result is a smoky, salty, bright salad that is incredibly filling, and incredibly easy to make.
Ingredients.
2 large bunches kale, stripped from the stem and roughly torn (stems discarded)
extra virgin olive oil
some French bread, cut into crouton-sized cubes
freshly ground black pepper
Parmesan cheese, shaved
Dressing.
1/4 cup lemon juice
1/4 cup extra virgin olive oil
1 tablespoon Dijon mustard
1 clove garlic, very finely minced or grated with a microplane
1/2 teaspoon anchovy paste
kosher salt
freshly ground black pepper
Directions.
In a small bowl, whisk together lemon juice, olive oil, Dijon, anchovy paste, garlic. Add salt and pepper to taste. Set aside.
Preheat your broiler while you toss the croutons with plenty of olive oil on a large baking sheet. They should mostly coated but not saturated with oil. Pop the croutons under the broiler and toast, tossing often, until they are golden. Remove from the oven, season with lots of freshly ground black pepper, toss, and transfer them to a paper towel lined plate. Set aside.
Heat your grill to high while you wash and prepare your kale. Toss the torn kale pieces into a large bowl, drizzle with a tablespoon or two olive oil. Using a pair of tongs, transfer the kale directly onto the hot grill. Allow the kale to wilt and char, tossing every couple of minutes. Transfer the grilled kale to a large bowl, along with the croutons and parmesan cheese, and toss with lots of Caesar dressing. Serve immediately.
Lauren -I’m glad to hear you are able to work towards healing your back. Back pain is horrible. While the kale salad looks delicious, it’s the Mac and cheese that has my mouth watering. Can you share your recipe sometime?ReplyCancel
Things have been pretty quiet around here… at least online. I haven’t been cooking much these past two weeks. The reason I haven’t been cooking is two-fold. First, the temperature has been up in the 90’s almost every single day. We still have to eat, of course, but I have been avoiding the stove, grill, oven, and every other source of heat. We’ve been having panzanella salads, cold pasta salads, plain-old salads, grilled kale caesar salads, Thai salads, and the occasional bowl of cereal for dinner… last night we fed the girls and then forgot to make food for ourselves. We only remembered that we hadn’t had dinner when we climbed into bed at 10:30pm and by then it was too late, and we were to tired to do anything about it.
The second reason I haven’t been cooking much is that my back has been hurting a lot and I’ve been feeling pretty down. Spending time driving to doctor appointments or on the phone with the insurance, spending lots of money on an MRI, spending way too much time Googling medical terminology and watching YouTube videos on anatomy have a way of zapping your optimism. I can only sit or stand still for a few minutes before my muscles tighten up and start to ache so I’ve been avoiding working, and cooking. The irony, if that’s what you can call it in this case, is that my work, and my cooking, are what keep me going throughout the day. Creating recipes, playing with ingredients, photography, writing, and ultimately feeding my family what I’ve created is what motivates me and keeps me energized. Cooking is my creative outlet and it’s something I feel fulfilled by and proud of.
I had an MRI last week because half of my leg wasn’t working and my doctors wanted to rule out a major injury. The MRI came back totally clean which is wonderful; no herniated disc, no slipped vertebrae, no surgery, no degeneration, no arthritis. But a clean MRI also means that nailing down the cause of my pain and nerve impingement isn’t going to be quite as easy as taking a picture, or in this case, a magnetic resolution image. I got a cortisone injection in my left hip to try to get some of the inflammation down and I’m heading back to the physical therapist with a little more information and we will change direction by adding more exercises to my routine. I’m determined to work my way out of pain; part of that means not letting my pain get in the way of my cooking because without it I feel lost and defeated and bored. In order to defeat the discomfort I need to stay positive and active. I hate sharing this here because I pride myself on being a positive, proactive person and it’s hard for me to admit that I’m having a hard time.
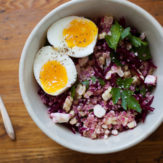
I went grocery shopping yesterday and loaded up on ingredients to do some proper cooking, or at least some grilling. I have been doing a little cooking… or rather, I’ve been mixing together ingredients that “cook” themselves. I’ve been playing around in the kitchen making Crème Fraîche, which requires no cooking at all. Last week I shared my Cherry Clafoutis recipe which is served with Crème Fraîche. I had decided to make my own Crème Fraîche rather than buying the small $6 tub of it at the grocery store. I was a little apprehensive about making something that’s fermented, which is kind of silly considering that my husband ferments things for a living!
Crème Fraîche is a cultured cream made by combining heavy cream with a starter and allowing it to thicken and develop a slightly tart, nutty, rich flavor. Crème fraîche is less sour than sour cream, and used for savory dishes and well as for desserts. It can be used on top of fresh berries or pie, to add cream to soups, thicken sauces, etc. It’s commonly used all over Europe, but up until recently I couldn’t even find it in the grocery store here. I did lots of research for different Crème Fraîche recipes and set about experimenting. Our counter for the last week has been covered in little bowls and cups filled with heavy cream and buttermilk, each with it’s own Post-It to remind me how much of each ingredient I had mixed together and how long the bowl was supposed to sit out.
This is all sounding pretty complicated but it’s actually really easy. All you need is heavy cream and buttermilk! What I found with my recipe experimentation is that the recipe isn’t perfectly fixed. I made three different variations of Crème Fraîche; each had it’s own flavor profile depending on the ratio of buttermilk to heavy cream. All the combinations were relatively similar, but there were subtle differences in the flavor and in the texture. Depending on what kind of buttermilk you buy, and what kind of heavy cream you buy, and what the temperature is outside, the fermentation time can vary quite a bit. You also can control the tartness of the crème fraîche by adjusting the buttermilk to cream ratio. Below are the different variations I tried and a couple of notes on each of them.
Version 01.
Ingredients.
2 cups heavy cream
1 tablespoon buttermilk
This combination was our favorite. It thickened up more than the others and was rich, creamy, nutty, and lightly tart.
Version 02.
Ingredients.
2 cups heavy cream
2 tablespoons buttermilk
This combination tasted a lot like tart cream cheese, it tasted a little like almonds, and had a nice texture.
Version 03.
Ingredients.
1 cups heavy cream 2 tablespoon buttermilk
This combination was nutty and tart; a lot like sour cream. This was also the most liquid/thinnest Crème Fraîche.
Directions.
Combine the heavy cream and buttermilk in a small bowl. Stir to combine. Cover with a thin cloth and let it stand at room temperature, preferably in a warm, draft free place, for 12-24 hours. When it’s the thickness that you like, stir it, cover it and refrigerate until chilled before using. It will keep in the refrigerator for about a week.
Anne-I’m glad the MRI was clean, and hope you can find the source of the pain soon. Good on you for deciding to work through it! I hope the cooking is a therapeutic as ever. And selfishly I still get to see your recipes! 😉ReplyCancel
kacieblogs@gmail.com-Thanks, Anne. I will definitely get through this. Just gotta fight through the hard parts. xoxoReplyCancel
Rebeka-I feel your pain with the whole pain and inexplicable numbness -> MRI -> no conclusive results + so much pain all the time -> you start to get really down on things which is not typical -> that makes you feel even worse about everything. It’s an awful cycle. -> You’re in debt from the MRIs but you have no conclusive results and it’s all so frustrating and awful. I totally, totally get it. The same thing happened to me a while back (I still hurt – they still don’t know why half of my body went weak and numb). I’m so sorry. I hope they figure out what’s going on and that you feel better soon.
Also, I’m not very good with chemistry related things, but it’s interesting that the higher the buttermilk to cream ratio, the thinner the crème fraiche is. You would think more buttermilk = thicker results. Crazy! I will have to try this next time I want to make something requiring crème fraiche, because, yes, it’s SO expensive at the store.ReplyCancel
kacieblogs@gmail.com-Rebeka,
I’m sorry you’ve been through this, and living with this too. The wonderful part is that I am able to do something about it now… I’m seriously determined and feel like I have the opportunity to undo the imbalance. Sending a hug to you. … Right? I was so surprised but I guess it’s the higher fat content? I dunno. Whatever it is, it’s good!ReplyCancel
Kyle and I took the girls cherry picking, although if you were to as Gigi she would definitely tell you we went cherry eating. That girl ate so many cherries I’m surprised she didn’t turn into one a lá Violet in Charlie and the Chocolate Factory. She had cherry juice dripping from her chin and off her elbows which made me glad I had had the forethought to put her in clothes that were already on their way to the next realm. Lulu was tucked happily in her Solly Wrap for most of the outing and I was feeding her little cherry quarters like a baby bird. The folks at the U-Pick probably should start weighing children going in and coming out and add that to your charge. We picked thirty pounds of organic Lambert and Bing cherries but Lord knows how many cherries Gigi gobbled up!
PINPINPINBing cherries the dark red, sweet kind that are readily available in most grocery stores this time of year. We didn’t pick quite as many of those as we rounding out the end of Bing season here. But the day we showed up to pick cherries, the Lambert cherries were freshly opened for picking. We arrived early in the morning so we literally got the cream of the crop. Lambert cherries look really similar to Bing cherries. They have the same heart shape, and similar color. The Lambert cherries had a slight ruby hue that seemed to glow through the dark crimson base color; they looked like a great red wine. The Lamberts were a tiny bit less sweet than the Bing cherries, and since I prefer my fruit and berry based desserts on the slightly tart side, I couldn’t wait to pit and put these cherries to use.
PINClafoutis are one of the simplest things to bake. They’re almost as simple to put together as a frittata. Clafoutis are a tradition French dessert: a flan like base peppered with cherries and served dusted with powdered sugar, or with a little crème fraîche. For my version, I used lots of eggs, a bit of lemon zest, and I made crème fraîche from scratch to serve with it. It was a wonderful way to take a chunk out of our thirty pound hall; the rest are in the freezer waiting to be made into crumbles and pies. This dessert is meant to be served warm or at room temperature, which is how we enjoyed it the first night. But, I found that I really loved it really cold, straight from the refrigerator. It’s wonderful with a dollop of tart crème fraîche and a hot cup of coffee for breakfast.
Ingredients.
1 pound pitted Lambert or Bing cherries
3/4 cup whole milk
1/2 cup heavy cream
4 large eggs
2 teaspoons pure vanilla extract
1/4 teaspoon fine salt
1/2 cup all purpose flour
1/2 cup granulated sugar, plus one tablespoon for the pie dish
1 tablespoon butter, for greasing
zest from 1/2 a lemon (about 3/4 tsp)
crème fraîche or powdered sugar, for serving
Directions.
Preheat the oven to 375ºF.
Whip the eggs and sugar together in a stand mixer on medium-high speed (using the whisk attachment) until it’s a light, fluffy, and well combined. On low speed add in the vanilla, milk, cream, lemon zest, flour and salt.
Butter a 9” pie dish. Add about a tablespoon of sugar to the dish and roll it around to coat. Discard the excess sugar. Fill the bottom of the pie dish with your cherries. Slowly pour your batter over the cherries.
Bake in the oven, on the middle rack, until the flan/custard has set and the top is lightly golden, about 50 minutes. You’ll know the custard has set when you insert small knife into the center of the clafoutis and it comes out clean.
Remove your clafoutis from the oven, allow it rest for ten minutes or so before serving. You can serve it dusted with powdered sugar, or with a dollop of crème fraîche or whipped cream.


.jpg)
.jpg) PIN
PIN.jpg) PIN
PIN PIN
PIN.png)


Carie - Oh that looks delicious and fresh – perfect for sticky hot summer days!
kacieblogs@gmail.com - Thanks! I’m all for anything that requires zero “cooking”!
Kaylan - The recipe looks delicious and beautiful photos! That first one of you and the girls and kitty is just so perfect. Simplicity…something I am always striving for and can’t ever seem to achieve. Loved hearing your reflections on it.
kacieblogs@gmail.com - Always a work in progress, friend! I’m so excited for your move and will be thinking of you while you manage the next few months on your own! xoxo