It’s early in the morning right now. I woke up around 5am and couldn’t fall back asleep. I’m a person who needs lots of processing time in order to keep track of everything, and with busy days and busy kids I don’t get that time as often as I would like. Every once in a while, I wake up early and can’t get back to sleep, so I get up and make the best of the quiet, dark hours. Kyle gets up early almost every single morning, and on these rare days when I wake up before everyone else I can see why he does. It’s still and silent and it’s nice to sip a cup of coffee from beginning to end without interruption. Not that I’ll be making a routine out of this. You know what I love more than silence and coffee? Sleeping until the last possible moment before I have to get up.
Last week was productive and busy. I got to celebrate my birthday quite a few times with my girlfriends, and my friend Marion ditched her family in order to spend some time with mine. It meant so much to me to have her here, and the girls adore her. Kyle and I also got to go celebrate both on my birthday and Valentine’s Day! I was completely spoiled the last week.
.jpg) PIN PIN
In between celebrating we’ve been taking advantage of the amazing weather to get outside for little hikes, playing in the backyard and dreaming about what we will plant in the garden. We’ve also been working on turning the garage into a usable space for Kyle, and I’ve been turning our house upside down in an effort to organize the kids’ toys, costumes, and books. How in the world do children accumulate so many things? Even though I’m diligent about keeping the flow of stuff to the donation center steady, the toy bins seem to slowly fill with random trinkets and dolls! As the weather is decidedly spring-like, I guess you could say we’ve been spring cleaning. A program we plan to continue on with this weekend.
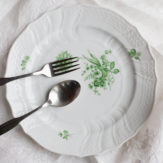
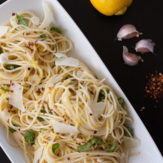
With all the meals out and madness of taking on huge projects, I’ve been cooking very simple, inexpensive, one dish meals. This salad of Orzo Pasta with Sausage, Spinach, Feta, and Dried Cranberries has become a staple around here. It’s my go to lunch on weekends.
.jpg) PIN PIN
ORZO PASTA WITH SAUSAGE, SPINACH, FETA, AND DRIED CRANBERRIES
Ingredients.
16 oz box orzo pasta
4 cups baby spinach
4 fully cooked chicken sausages, sliced 1/4” thick on the bias
1/3 cup crumbled feta
1/3 cup dried cranberries
1/8 cup champagne vinegar
1/4 cup extra virgin olive oil
1 tablespoon Dijon mustard
2 tablespoons finely minced shallot
kosher salt
freshly ground black pepper
small handful fresh parsley, coarsely chopped
Directions.
In a very large bowl whisk together the champagne vinegar, mustard, and shallot. Continuing to whisk, slowly drizzle in the olive oil. Season the dressing to taste with salt and pepper. Set aside.
Heat a skillet over medium-high heat and cook the sliced sausages until golden on both sides. Transfer to a plate and allow to cool a bit.
Meanwhile, bring a large pot of salted water to a boil, cook the orzo until al dente. Drain, and rinse with cold water until cool. Transfer to the large bowl with the dressing and toss to coat.
Add the sausage, spinach, feta, parsley, and dried cranberries into the bowl with the pasta. Toss gently to combine. Season to taste with salt and pepper. Serve immediately.
Serves 4 adults.
PRINTABLE RECIPE.
ORZO PASTA WITH SAUSAGE, SPINACH, FETA, AND DRIED CRANBERRIES
I met Ashley and her family about a year and a half ago, when they were visiting our town. We’ve become fast friends and I’m so glad to know her. If you read Ashley’s blog, Not Without Salt, you understand why. Ashley is genuine in her writing, creative in her approach to food, and inspiring in her photography.
.png) PIN PIN PINPIN PINPIN
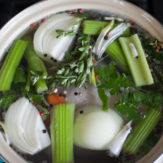
She’s the kind of food blogger who you dream might invite you over for dinner; which is exactly what she did on our following trip up to Seattle. The forecast called for chilly temperatures and rain so Ashley had cooked up a fabulous, rich vegetarian stew. Her three kids and our two quickly slipped off to play and the four of us, Ashley, Gabe, Kyle, and I sat outside in t-shirts sipping cold beer and eating our delicious wintery stew and laughing about the unpredictable nature of Seattle weather.
For Christmas my friend Ashley handed me a copy of her first cookbook, Date Night In, along with some other goodies. I sat down and read it cover to cover as quickly as I could. Date Night In is full of the kind of recipes you’d expect from Ashley: inventive, appealing, accessible, delicious… and full of beautifully written essays on the journey of love, marriage, and relationships. Ashley writes openly about her marriage to Gabe; their struggles, triumphs, and the “every days” in-between. If you’re looking for a special Valentine’s Day gift for someone you love who loves to cook, Date Night In would be at the top of my list.
PIN
Having date nights in is not a new concept around our house. When Gigi was about the age Lulu is now, we declared that Wednesdays would be date nights. For us that meant that I made something special for dinner and we would cozy up to play a board game or watch a movie together after the kid(s) were in bed. Until I read Ashley’s book it never occurred to me to stuff the kids full of pasta and share a special meal with just Kyle; like an actual date!
I’ve cooked so much from her book already. It’s speckled here and there with splatters of olive oil, flour, and frosting; a mark of a favorite. For Gigi’s birthday she chose an impressive, made-from-scratch Rainbow Chip Cake from Ashley’s book. Gigi chipped in (no pun intended), making the rainbow chips, and the cakes, combining the frosting, and assembling the cake. She, and I, were so proud of the final result, and since her birthday falls of New Year’s Eve we enjoyed a slice at home before taking the rest of the cake across the street to share with neighbors. You might want to make a note that the cake goes very well with champagne.
PINPIN
Next up was Ashley’s Fried Chicken Sandwiches on Black Pepper Biscuits which you’ll find on page 173. I was drawn to this recipe for obvious reasons: perfect fried chicken, fluffy black pepper biscuits, grainy mustard, bright dill pickles, sweet honey! They turned out so well that I made them two days in a row and our neighbors came over two days in a row to eat with us. They declared that these sandwiches resulted in the “best meal they’d had in a long time!”
PINPINPINPIN
Finally, my most often made thing from Date Night In: Hot Dates with Olive Oil and Sea Salt. These dates are so addictive. I find myself buying Medjool dates in bulk and making a few almost every afternoon while the girls nap. You simply sauté the dense, sweet dates in fruity olive oil for a few minutes, transfer them to a plate and sprinkle with flake salt. That’s it! They’re so simple, yet somehow complex and delicious and just the thing I need mid-day. I love to make these and a cup of black tea and zone out for a few minutes while eating them with my fingers. Trust me, you need to try these.
PINPIN
HOT DATES WITH OLIVE OIL AND SEA SALT
Ingredients.
1 tablespoon extra virgin olive oil
4-6 Medjool dates
flake salt (such as Maldon)
Directions.
Add the olive oil to a sauté pan over medium heat. Add the dates and stir to coat. Keep the dates moving so that they don’t scorch but rather get warm and soft and blister slightly. After 3 to 4 minutes in the pan, place the hot dates on a plate and drizzle with the olive oil from the pan. Add a bit more olive oil if you’d like. Sprinkle with a pinch of flake salt. Serve immediately.
Serves 2.
PRINTABLE RECIPE.
HOT DATES WITH OLIVE OIL AND SEA SALT
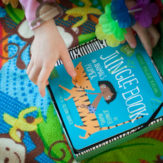
Is anyone else up at 5am watching Snow White with a sick kid? Just me? Well, since I’m up and already sipping coffee, I thought I might as well pull open my laptop and say hello. Gigi started off the week with a bad fever as a reaction to some immunizations, and now has a yucky cold. Rather than let her cough and sniffle away the wee hours in bed I brought her out to the couch to get cozy and watch one of the movies she picked out at the library. Poor kid sounds like Sleepy, Sneezy, Dopey, and Grumpy right now.
It looks like we will be spending our Friday cozied up, watching movies, making cookies, doing puzzles, and reading books. The ladies of our neighborhood have started a little wine, I mean book, club and we’re all settling in to read The Goldfinch. What are you all reading right now? After a couple of years of not reading as much as I’d like to I’m finding that I want to devour every book in sight and I’d love some suggestions!
I do have a recipe for you this morning but this “recipe” isn’t really a recipe at all, although all of the ingredients are edible. For the past year I’ve been making my own deodorant at home. I used to use, and have tried dozens of, natural store-bought brands but they didn’t seem to work for me at all. Some better than others, but I never felt totally fresh. Occasionally I would get frustrated and buy a conventional antiperspirant, but I hated using that toxic stuff on my body. With a little research, and some tests, I came up with a formula for natural, homemade deodorant that works wonderfully for me.
PIN
This kind of deodorant can take a little getting used to as the baking soda can feel a little grainy, and it can take your skin a bit to adjust to the ph of it, but it works great for me. The first recipe I made, and other recipes I researched didn’t call for almond oil, but I added it to soften the deodorant and make it feel smoother and more lotion. It worked and didn’t change the effectiveness at all. There are some other notes added in with the recipe directions. You should be able to find all of these ingredients at the grocery store, some in the bulk section or natural foods section.
PINPIN
HOMEMADE LAVENDER DEODORANT
Ingredients.
1/2 cup virgin coconut oil
1/4 cup arrowroot powder (use cornstarch if you can’t find arrowroot powder)
1/4 cup baking soda
1 1/2 tablespoons almond oil
1/4 teaspoon (about 8 drops) lavender oil
Directions.
Melt the coconut oil in a small saucepan over very low heat. Thoroughly whisk in the arrowroot powder and baking soda until they are completely dissolved in the coconut oil. Turn off the heat and stir in the almond oil and lavender oil. Allow the liquid to cool and harden, stirring occasionally until it’s completely cooled.
Once it’s cooled completely it will be a thick paste. Stir it well before transferring it to a glass container with a tight fitting lid.
To use it, simply scoop a small amount (about 1/4-1/2 teaspoon) out with your fingertips and rub into your underarms as you would lotion.
Over time, especially in hot summer days, the deodorant may “fall apart”. You can reform it by warming it up slightly and repeating the cooling/stirring part of the recipe.
*If you’ve been using tradition antiperspirant you will notice that you will sweat when you wear deodorant. Antiperspirant doesn’t allow you to perspire, deodorant does. Also, it may take your skin a week or so to adjust to the ph of this deodorant and your underarms might itch a little (I didn’t experience this but apparently some people do).
Yield: about 1/2 cup of deodorant
PRINTABLE RECIPE.
HOMEMADE LAVENDER DEODORANT
It’s 8:25 in the morning and Gigi is running around the house wearing a to0 small swimsuit, and life jacket, and Little Miss Lulu is wearing too long princess dresses which she brings to me over and over and over again and demands, “cosuuuuume on, cosuuuuume on!” So the costumes go on and then come off, go on again, and off again. Gigi has orchestrated the conversion of our small living room into a beach: sand, water, beach chars, and pretend sunscreen. Something tells me these two are ready for warmer weather. Me too, kids.
PIN
While they are passing these grey, freezing, uneventful winter days lounging at the beach and testing boundaries, I have been in the kitchen. Thanks to so many of you who donated, I’ve been able to indulge a bit in the wonderful winter citrus fruits that have been tempting me all season! Last time we were at the store I grabbed a few Meyer lemons and blood oranges with the intent of candying the lemons and using the blood oranges to brighten up a simple salad. Yesterday morning I set out to candy the Meyer lemons; the minute I sliced into them I felt the greyness of January lift away. Meyer lemons have such a wonderful scent: like tangerines, lemons, sugar, and sunshine combined. The lemons turned out so well I figured I should probably candy a couple of blood oranges too.
Candyied citrus fruit tastes like… well, candy! They’re like candy for grown ups. The approach is pretty simple, although I do have a couple important tips. The majority of recipes “out there” did not call for blanching the fruit first. I did a test, blanching half and not the other, and found that the blanched, then candied fruit was much softer, and turned completely translucent, while the unblanched fruit was a lot chewier and never fully turned translucent. You can actually see this difference in the first photo of the cooling Meyer lemons; the lemons on the left weren’t blanched, the ones on the right were. Conclusion: It’s worth the extra step to blanch the slices. The other note is that it’s important to have plenty of simple syrup that the fruit is simmering in; this gives the fruit the ability to float about, and it doesn’t reduce to a thick, dark, caramelized syrup during the hour that the fruit is cooking!
PIN
Finally, you might be wondering what to do with candied citrus! Here’s a little list: eat it straight, add it to a cocktail (such as an Old Fashioned) in place of the syrup and lemon of orange garnish, you can also use it to top cakes or a bowl of ice cream or pancakes or yogurt! These are pretty versatile treats. This recipe would work well with all citrus fruit, and you could use the same approach for candying just the peels for cocktails. Now, without further ado, here is the recipe for Candied Meyer Lemon and Candied Blood Orange!
PINPINPINPINPINPINPIN
CANDIED MEYER LEMONS & CANDIED BLOOD ORANGES
Ingredients.
4 Meyer lemons
2 blood oranges
4 cups granulated sugar
4 cups water
large pot of boiling water
large bowl of ice water
Directions.
Wash the fruit, then slice 1/4” thick, discarding the ends. Pick out any seeds and discard them.
Bring a large pot of water to a boil and prepare a large bowl with ice water. Once the water is boiling, carefully drop in the slices of fruit. Stir gently and boil the slices for one minute. With tongs or a slotted spoon transfer the fruit to the ice bath until cool. Drain the fruit and separate the oranges from the lemons in preparation for candying them.
Divide the water and sugar into two large, non-reactive skillets, and heat on medium-high, stirring well, until the sugar has dissolved and the syrup is simmering.
Add the oranges to one pan and the lemons to the other. Bring the liquid back to a low simmer. Cook the fruit at a low simmer for 45 minutes to 1 hour, stirring and flipping the fruit occasionally. If the syrup starts to reduce to much add 1/4 cup of water to keep it the proper consistency. Cook until the white part of the rind has turned translucent. Using tongs, gently transfer the slices to a wire rack that has been placed over a baking sheet or roasting pan. Allow to cool completely before using.
Store in an airtight container with parchment paper to separate layers. The fruit will save in the refrigerator for about two weeks.
Save the cooled syrup for cocktails or to use over vanilla ice cream!
PRINTABLE RECIPE.
CANDIED MEYER LEMONS & CANDIED BLOOD ORANGES
|


.png)


Ashley - My daughter still takes at least two naps. I exercise and get things done for two naps and the other I drink tea and dates and zone out too. Good to know I’m not the only one.
Rebeka - I made these the other day and they are so, so good. I love me some warm dates, especially if they’re served with something salty (you know, like salt haha).