These past few weeks have been hard. So hard that I’ve hardly opened my computer for anything other than to watch reruns of Gilmore girls or plug somewhat numbly away at work deadlines. I wish I had a recipe polished up for you today, goodness knows I have a few that have been waiting to make their debut for the past month, but today I just wanted to come say hello. I am taking things one day at a time; focusing on my amazing husband and my wonderful kiddos, feeling lots of gratitude for everything we have and taking lots of deep breaths. I know I’m not alone in these hard seasons; I send my love out to any of you who might also be walking through hard times, and I hope you have as much love and support in your lives as I do.
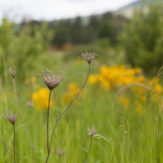
I’ve been spending lots of time sitting out in the backyard watching the kids play in their playhouse, pluck parsley leaves to nibble on, and make mud pies. I love watching them gather their buckets and pails of water and squat down next to the sage, rosemary, and thyme plot where Gigi has, in addition to the herbs, planted bunches of fake flowers, and make a big, giant mess. It generally begins innocently enough, with a genuine attempt at making a mud pie. But soon enough it devolves into muddy chaos which leads to lots of laughter, hosed off hands and feet, stripped off clothes, and multiple baths and loads of laundry per day.
.jpg) PIN PIN .jpg) PIN PIN.jpg) PIN PIN PIN PIN
Since I don’t have a recipe for you, I thought Gigi might be willing to share her recipe for making the perfect mud pie. She was… “I use mud and water and put it in a bucket and let it dry. I get the water from the big hose and I get it by myself. I put it in a bucket. I carry the water over in the bucket but sometimes in the watering can but not all the time to the dirt and you dump it out, and scoop it up and put the dirt in the bucket and I mix it with a shovel or a spoon from the playhouse. I leave it in the bucket for, like, 20 hours and keep it forever.”
PINPINPINPINPINPINPIN
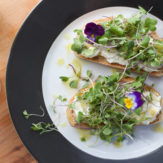
I’ve been wanting to start using essential oils for a long time. So when my friend Kaylan sent me a text asking if I’d be interested in trying out some oil to make a recipe, I happily agreed. We chatted about options for different oils but settled on tangerine oil, which immediately got me dreaming about shortbread cookies. To be honest, I’m always dreaming about shortbread cookies. They are my favorite cookies: flaky, buttery, slightly sweet. Besides, any dessert that can be eaten alongside a cup of hot coffee first thing in the morning goes straight to the top of the list.
When the tangerine oil arrived I was surprised by it’s rich, sweet, vibrant aroma. Cracking open the seal on the bottle let the smell of a hundred tangerines into the air. It was reminiscent of standing over the sink in early fall sunlight peeling an orange; watching and smelling as the spray of oil is released from the peel as it rips away from the dense, dripping flesh of the fruit. I stood in the kitchen, inhaling the tangerine oil scent and thought that perhaps the tangerine shortbread cookies would benefit from the addition of candied orange peel.
PINPINPINPINPINPINPIN
These cookies are everything wonderful about shortbread, but more. The amazing smell of butter and sugar whipping together in the stand mixer smells so wonderful, then the addition of a few drops of tangerine oil sends it into another realm of indulgence. The addition of the oil made the dough taste just like those orange and vanilla sherbet cups I used to devour as a kid, one wooden scoopful at at time. Once baked the creaminess mellowed into a warm, buttery flavor that nestled in happily alongside the tangerine flavor. Smack in the middle of each cookie, a gently pressed candied orange peel lies waiting. It breaks up the flaky texture of the cookie with a gummy, sugary treat. This recipe leaves you with about 30 cookies which is plenty to share with neighbors or friends; if you can manage to get any out the door. You could use the zest of an orange or tangerine in place of the tangerine oil too, but the oil is definitely something special.
PINPINPINPINPINPIN
Kaylan is giving away one bottle of tangerine oil over on Instagram!
PINPIN
SHORTBREAD COOKIES WITH CANDIED ORANGE AND TANGERINE OIL
Cookie Ingredients.
3 sticks unsalted butter, softened
1/2 cup granulated sugar (plus more for topping)
1 cup confectioner’s sugar
1/2 teaspoon fine salt
3 1/4 cups all-purpose flour, sifted
2 teaspoons pure vanilla extract
1 egg yolk
5 drops tangerine oil
Candied Orange Peel Ingredients.
3 medium navel oranges, preferably with smooth peels
2 1/2 cups granulated sugar, 1 cup set aside
1 1/2 cups water
3 drops tangerine oil
Directions.
In a stand mixer, whip the butter for a few minutes until it’s glossy and light. Add in the granulated sugar and mix on medium-high for 3-4 minutes, until it has creamed into a frosting like consistency. Add in the cup of confectioner’s sugar and mix until combined. Add in the tangerine oil, vanilla, and egg yolk and mix until combined. In a separate bowl, whisk together the flour and salt, then add it, one cup at a time, to the wet ingredients, mixing until blended.
Transfer the dough to a large piece of plastic wrap, shape it into a log and seal it up. Chill the dough in the refrigerator for at least 30 minutes… the cooler the dough, the easier it is to work with.
While the dough chills, make your candied orange peels! Cut the tops and bottom ends off of the oranges. Score vertically through the peel to the flesh on all four sides of the orange, and peel the four large pieces from the fruit. Slice each peel section into thin strips. Place the strips in a small pot of cold water, bring to a simmer for one minute and drain. Repeat this blanching process two more times.
In a large pan add the 1 1/2 cups of sugar and water. Turn the heat up to medium and allow it to slowly come to a simmer while you stir, dissolving the sugar. Once the sugar is dissolved, add in the orange peels and keep on a very low simmer, stirring gently very occasionally, for about 45 minutes, or until the syrup has reduced to a thick, bubbly, fragrant syrup and the pith part of the peel is translucent.
While the peels simmer, pour the remaining cup of sugar into a large casserole dish. Add 3 drops of tangerine oil and toss it all together with a fork.
Once the peels are finished simmering, drain them in a fine mesh strainer. Let the excess syrup drip off, then quickly dump the peels into the tangerine oil-sugar mixture. Toss quickly, coating the peels in sugar. Remove the peels and lay them out in a single layer on a cooling rack. Allow them to cool.
Preheat your oven to 350 ̊F. Flour your work surface and working with half of the dough at a time, use a rolling pin to spread the dough out into a sheet that’s about 1/4 inch thick. Using a sharp knife, cut the dough into 3.5” x 2.5” rectangles. Continue until all the dough has been cut out. I found it easiest bake one batch (two sheets) while I kept cutting out cookies for the next round. I laid the cut out cookies on parchment paper and then transferred them to the baking sheet.
Lay the cut cookies 1 inch apart on a parchment paper covered cookie sheet. Gently press one of the candied orange peels into the top of each cookie. Sprinkle each cookie with a pinch of granulated sugar.
Bake two sheets of cookies at a time on the upper and lower middle racks of the oven for 20 minutes, or just until the cookies begin to very slightly brown on the sides. Rotate them halfway through baking. It’s important to note that if you have a little dough leftover and only have one rack in the oven, the cookies will bake a bit faster, so keep an eye on them!
Move the cookies immediately to a cooling rack, keeping them on the parchment paper.
The cookies will store well for a few days in an airtight container.
!
Yield: 30 cookies
PRINTABLE RECIPE.
SHORTBREAD COOKIES WITH CANDIED ORANGE AND TANGERINE OIL
Summer has finally settled into a steady-breeze, 80 degree, sit in the backyard and watch the kids splash in the pool kind of season. I’m not sure what was going on in June and July this year with their soaring, searing temperatures and locked down, air conditioned days, but I’m feeling much more willing to let summer carry on for another 6-8 weeks now that the forecast actually seems to be representing Oregon and not Arizona.
It’s hard to believe that in just a couple of months all that will be left of this hot, balmy summer is the Chaco tan lines that zig-zag across the tops of my feet; the new shells added to the vase that sits on the sill above the kitchen sink; and bags and bags full of summer fruit that we picked at the height of its’ season. I toss blueberries into our morning smoothies every day so I don’t imagine that our stash will last long into fall.
We recently took a few cups of our freshly harvested berries and whipped them up in the blender with a can of coconut milk, a couple tablespoons of honey, and a banana, we then poured the mixture into our NoPro Ice Pop Maker. This resulted in sweet, tart, rich, intensely blueberry-y popsicles that we can’t get enough of. Just this morning I made a second batch of them, adding in half a cup of vanilla bean ice cream because, let’s be honest, there are few things that don’t benefit from a couple silky, creamy scoops of ice cream.
PINPIN
PIN
I sat on the couch this afternoon, read a few chapters of The House at Tyneford, and ate one of the ice cream-spike creamsicles. I love that way that they melt slowly at first, forcing you to nibble on the top corners until they suddenly become soft enough to devour. These pops are flecked with blueberry seeds which add a delicious texture to the melty, creamy treats. I guess if it means more mid-afternoon creamsicles, summer can stick around for a little while longer.
PINPINPIN
BLUEBERRY COCONUT CREAMSICLES
Ingredients.
1 banana, peeled
2 1/2 cups fresh blueberries
1 13.5oz can coconut milk (whole, not lite)
2 tablespoons honey
1/2 cup packed vanilla bean ice cream (optional)
Directions.
Add all of these ingredients to a powerful blender and blend until completely smooth. Pour the mix into your popsicle mold (add sticks, etc. according to the manufactures directions), and place in the freezer for at least 4-6 hours or until completely frozen solid.
PRINTABLE RECIPE.
BLUEBERRY COCONUT CREAMSICLES
PIN
We spent last weekend running around Seattle, and I am very much enjoying a quiet weekend at home. It has been painfully hot here and this morning it’s finally cool enough for me to sit outside with my second cup of coffee, and my laptop and write this recipe up while I listen to the buzz of AC units, and enjoy the breeze that carries with it the hope of a cooler afternoon.
The strangest thing has been happening lately, as I sit down to write, full of things to say, my thoughts get all muddled on the way to the page and I can’t seem to put into words what I’m trying to say. Come to think of it, it’s not just in writing. The other night Kyle and I went on a date to Essex, in Seattle, and as I was trying to explain an idea I had to him, I couldn’t. I just couldn’t get the concept across. The more questions he asked, the more frustrated I became; not with him, but with myself for not being able to articulate what had been so clear inside my head moments before.
Ideas, words, recipes, and general thoughts just don’t seem all that interested in landing how and where I intend them to lately. I can only suppose that this has to do with the work I’ve been doing lately on myself. I’m learning how to live wholeheartedly and how to let go of anxiety, and what this means in a sense is that I’m learning how to use my brain in a different way. In fact, it means I’m learning to quiet certain, loud, parts of my mind and open up others. It’s a fantastically interesting and confusing thing to encourage the part of your brain that’s been driving the ship for years and years to let go of the wheel; especially when the part that’s meant to take over doesn’t know quite what it’s doing. All that to say that I had an idea for this post, but I forgot it.
When I get overwhelmed or when the anxiety wins, which it very often does, I am learning to wake up all my senses by breathing deeply, or engaging in a tactile, creative activity. Lucky for me cooking provides a pretty sweet outlet from the mess of my mind. I’m taking more time mid-day to make and eat lunch which gives me a mid-day break from the above mentioned journey, and nourishes me with much-needed calories to get through the day until that sweet little window after the kids are tucked into bed.
PIN
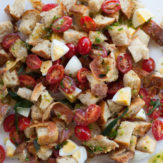
This quick Quinoa Salad has been a staple around here all summer, it’s been on camping trips with us, on day hikes too, and it’s something I love to make for lunch while the kids nap. I often eat it for lunch on it’s own, and serve it with soft boiled eggs or chicken sausages for dinner the same evening. The quinoa doesn’t take long to cook, and it cools quickly once the springy spirals have been spread out on a baking sheet. The rest of the recipe is just about adding in texture and flavor; bright parsley, raw crunchy beet, salty feta, and sweet corn are just some of the things you could toss in. Toasted, chopped walnuts would add buttery richness; halved, tart cherry tomatoes would add acidity; goat cheese would add creaminess; dried cranberries would add a bit of sweetness; basil would add a peppery bite; diced shallots would add a little spice. You could go a dozen directions with this simple salad. Whatever you toss in will be complimented by my go-to vinaigrette. The champagne vinegar base can be pretty aggressive so feel free to add more olive oil than I do to mellow it a bit. This dressing comes together easily whisked up in a small bowl, but when a certain someone skips their nap, it can also be easily shaken up in a small jar by small hands.
PINPINPINPINPINPINPIN
QUINOA SALAD WITH CORN, FETA, BEETS AND PARSLEY
Ingredients.
3 cups cooked quinoa
1 large red beet, trimmed, peeled and cut into matchsticks by hand or with a mandoline
kernels cut from two corn cobs
1/2 cup flat leave Italian parsley, roughly chopped
6oz. crumbled feta
1/4 cup champagne vinegar
1/2 tablespoon dijon mustard
1/2 cup extra virgin olive oil
kosher salt
freshly ground black pepper
flake salt
Directions.
To cook the quinoa, I follow the recipe for Perfectly Cooked Quinoa from It’s All Good.
1 cup quinoa
1 3/4 cup water
coarse salt
Rinse the quinoa thoroughly. Place it in a pot on a high heat with the water and a big pinch of salt. Bring the quinoa to a boil, lower the heat, cover the pot and cook until the liquid is absorbed and the quinoa’s germs look like lots of tiny little spirals. This should be between 12 to 15 minutes. Turn the heat off, place a try paper towel between the pot and the lid and let the quinoa sit for 5 minutes before fluffing it with a fork.
A quick personal note: when you “lower the heat” to cook the quinoa, keep it at a nice low simmer. For my stove that means keeping the burner at about medium-low.
Once the quinoa is finished, I pour it out onto a baking sheet and allow it to cool either on the kitchen counter, or in the fridge if I’m in a hurry.
In a small bowl, whisk together the dijon and vinegar, pour in the olive oil while whisking continuously. Season to taste with kosher salt and pepper.
Place the cooked quinoa to a large bowl, add in the beets, corn, parsley, and feta. Toss gently together. Drizzle the salad with the dressing and toss together again. Top the salad with a bit of fresh pepper and flake salt.
If you want to serve the salad with soft boiled eggs, I prefer 6 minute eggs. To make them I cover eggs with cold water in a saucepan. Then bring the water to a quick simmer, turn the heat off, cover the pot and let the eggs cook for 6 minutes before transferring them to a bowl of ice water. Once cool, carefully peel, slice in half and set on top of the served salad.
This salad is great day of, as leftovers, and also travels well! It’s a great picnic food.
PRINTABLE RECIPE.
QUINOA SALAD WITH CORN, FETA, BEETS AND PARSLEY
I’d thought that things were going well enough that I could pull off running into the store quickly with the kids. They’d been so cute all morning: reading books together, playing in the playhouse in their nightgowns, helping me drop off lunch to their Dad, picking out stamps at the post office. But that’s the error, right? Thinking you can squeeze in that one last errand even though it’s getting close to lunch time.
It started to go downhill the minute we entered the store. Both kids decided that it was boundary testing hour. They really went through the whole repertoire. They whined, they didn’t listen, they cried when I said, “No, we are not buying Minion underwear.”, they ran away when I asked them to come along. I should have just quit. I should have set down my basket and walked straight out of the store, but I persisted because we were almost done shopping by that point and coming back to the store another time would be impossible as I’d sworn in the midst of all of this to never, ever, ever, go to the store again, ever.
That hope vanished on the food storage aisle. It vanished because I got the Ziploc bags from the shelf and shoved them in the basket instead of letting Lulu do it. “I wan’ do it me-self!!!!”, she wailed… and wailed… and wailed. I employed all my patience, knelt down at her level and informed her that she was welcome to do it herself after she calmed down and asked nicely. “NO! I’m throwing a fit!”, she hollered… and hollered… and hollered. Just then a woman walked by me and said, loudly enough to warrant a quick kick to the shins, “That looks like payback from something…”. Payback? Payback!? If I weren’t such a good mom with all my eye contact and efforts being poured into my pissed-off-over-sandwich-bags-two-year-old that woman would have gotten a serious earful.
It took all my unoccupied brain energy to keep from turning around and releasing my mom-rage on her in the form of a speech that would have begun with, “Do you think that’s helpful, lady?!” Instead I scooped up my screaming toddler from the floor of the store, pinned her under my left arm, and marched her and her crying sister out of the store, strapped them into their carseats, and headed home. By the time we got home Gigi had calmed and had apparently decided to be “normal” again, but Lulu was in a rage. I set her in a quiet spot in her room and let her throw her fit.
Lu’s tantrum lasted for a full hour. 11:00am until 12:00pm. I checked on her from time to time but the moment she could hear my feet padding down the hall she’d add, “NO MAMA! GO ‘WAY!”, to her diatribe of curses she was hurling at me. The tantrum was varied, it was epic, it was actually kind of impressive. She lost her voice! I mean, I have to on some level respect that kind of commitment.
While she wailed and cried and kicked the wall I made meringues. I chose meringues because I’m working on a recipe for a magazine, but also because they employ the use of the mixer at high speed for several minutes… which means I only had to listen to about 43 minutes of Lulu’s tantrum, rather than the full 60. By the time Lu had calmed the meringues were in the oven, well on their way to becoming crisp, fluffly, pillows of sugar and caramel.
I love recipes that require minimal time to whip up, in the case of meringues that is quite literal… and espeically one that also turns down the volume on a tantrum! That one goes right to the top of the list. Of course, it wasn’t until after she calmed down and allowed me to enter her room that I realized that her windows were open. Sorry, neighbors. I’ll make you all some more meringues as an apology.
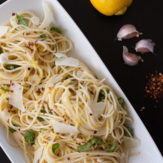
After I made the meringues, I turned my attention to making another minimal prep dish: Greek Orzo Salad. I’ve made it a handful of times this summer and I keep coming back to it because it’s healthy, simple, and can be made ahead on hot days. It’s exactly the kind of recipe I’d quickly explain to a friend over coffee, and she could zip home and whip it up without a second thought. What I love about it, aside from it’s ease, is the combination of flavors: briny olives, salty feta, sweet and smoky bell peppers, grassy parsley, sweet tomato, and slightly spicy shallot. Come to think of it a little peeled, seeded and diced up cucumber would be nice in this salad as well! All of these flavors are bound together with a bright, acidic Greek-style salad dressing.
PINPINPINPINPINIt’s the type of recipe I gravitate towards; the type that requires that you pay attention here and there but doesn’t call on all your time and energy. I love roasting peppers at home, they crackle and sizzle as the skin blackens, leaving the flesh bright and transformed, but you could also purchase pre-roasted bell peppers if you prefer. The whole salad takes about half an hour of semi-involved cooking time, and the result is a light, satisfying main or side course. We’ve had the salad on it’s own, served alongside grilled chicken, and also with grilled sausages. Next time Lu exerts her two-ness in the above described manor, maybe I’ll lean towards something savory like this salad to get me through it.
PINPINPINPINPINPINPIN
GREEK ORZO PASTA SALAD
Ingredients.
16oz box Orzo pasta
1 red bell pepper
1 yellow or orange bell pepper
1 small shallot, very thinly sliced
1 pint cherry tomatoes, halved
6oz feta, crumbled
1 cup roughly chopped flat leaf italian parsley
12 kalamata olive, pitted and roughly diced
1 tablespoon preserved lemon peel, very finely diced (optional)
1/4 cup red wine vinegar
1/2 cup extra virgin olive oil
1 tablespoon Dijon mustard
several turns freshly ground black pepper
1/2 teaspoon kosher salt
1/2 teaspoon dried oregano
Directions.
Roast the bell peppers over open flame (I do this on my gas stovetop), rotating occasionally, until the peppers are completely black. This should take about 15 minutes. Once blackened and charred, transfer the bell peppers to a bowl and cover the bowl tightly with plastic wrap and let them cool to room temperature. Once cooled, run them under cool water, rubbing them to slip off the blackened skin. Core the peppers and dice the flesh. Set aside.
Soak the sliced shallot in a small bowl of cold water for about 10 minutes to mellow the sharpness a bit. Drain and set aside.
In a small bowl, whisk together the vinegar, mustard, salt, pepper, and oregano. Slowly, while continuously whisking, drizzle in the olive oil until the dressing has emulsified.
Bring a large pot of salted water to a boil, add the Orzo and cook until al dente. Strain and rinse with cold water to cool the pasta.
Transfer the pasta to a large bowl. Add in the peppers, shallot, tomatoes, feta, parsley, olives, and preserved lemon to the bowl with the pasta, pour in the dressing and toss everything together until coated well with the dressing. Enjoy immediately or cover and set in the fridge for up to three hours.
|


.png)


Allison - Sorry things have been rough. Hopefully better times ahead! If you are looking for ideas for a blog post…..I would love to see your garden! I see bits of it here and there but would love to see all the beds and different containers and what you have planted. My garden was pretty sad this year, but hoping next year we can get a better start and spend more time on it.
kacieblogs@gmail.com - Thank you, Allison. Oooh that’s a great idea. It’s coming together for fall. It always feels like it’s “unfinished”, but I have a feeling it’s always going to be like that. I should have Kyle do a raised bed tutorial too.
Allison - Yes, I’d love to see the raised bed tutorial! We need to build some. Your garden looks great to me-but I know what you mean, it seems like there is always something that needs to be done!
MamaTito - This is so cute! I want some mud pie!
MamaTito - I’m sorry it is a tough time – seasonal transitions always get me. I hope those sweet mud pies warm the soul. I am a mama with younger ones, trying to get this whole “new food” thing to be exciting. If no new recipes come to mind, feel free to try mine with your kiddos (keep in mind, the video is a bit “young,” but the recipes really are easy, fun and delish!) Sending you love!
Here’s my little “making food exciting for toddlers” project: https://www.youtube.com/channel/UCDSkBFZkOMnpO6RMKC3Edjw
kacieblogs@gmail.com - Thank you so much for sending this! x