Since this is my first post of the new year, I guess I should begin by wishing you all a happy new year! We’ve spent the time between Christmas and now mostly hibernating. Gigi turned five years old and we spent her birthday as a family. I discovered Yoga with Adriene and it’s been a hugely beneficial addition to my days. My book club has been reading Great Expectations; the going was a little slow and tedious at first, but now towards the end I can’t put it down. I also started Brené Brown’s online semester class called Courage Works and it’s really, really great. Other than books, yoga, and a few sporadic play dates with friends things have been wonderfully quiet and contemplative. It’s been so nice to pull back from work, responsibilities, and obligations and just spend lots of quiet time settling in to the new year.
After a rather difficult 2015, I kept expecting all of that nice, quiet time to manifest into something bigger, and that one day I’d wake up and feel refreshed and renewed. I thought that one day I’d wake up and feel like myself again. But since the month of January has sidled by in a series of cozy grey days, piles of laundry, quite a bit of snow, trips to the library, and excessive cuddling and I still don’t quite feel like myself, I have instead come to the realization that I just have to start somewhere. Starting by sharing a recipe seems like the right place to begin.
The perfect recipe for this week is Thai Coconut Soup with Udon Noodles and Tofu; partly because it’s cold and wet and grey here, and partly because there is no wrong time for Thai Coconut Soup. I shared this recipe ages ago back on my old site, but somehow it missed getting transferred over and I’ve made some adjustments to it over the years, so here it is refreshed and renewed. It’s reassuring to know that a recipe can have a fresh start, even when it feels hard to manifest your own.
.jpg) PIN PIN
This soup is all about the broth which is rich and creamy thanks to peanut butter and coconut milk. The real flavor punch comes from the sofrito: slight heat from the chiles which, when cooked, mellow into a subtle warmth; fragrant and floral lemongrass; vibrant and zingy fresh ginger; assertive garlic and shallots; pungent and irreplaceable fish sauce. The broth is rounded out with a little brown sugar and a kick of lime juice. When it’s ladled into a bowl along with the cooling udon noodles, tofu, and cilantro the result is a wonderfully balanced, perfectly satisfying soup.
.jpg) PIN PIN.jpg) PIN PIN
THAI COCONUT SOUP
WITH UDON NOODLES AND TOFU
Ingredients.
Tofu.
1 14oz package of Firm Tofu (this needs to be drained so make sure to note the extra time in the directions)
1 Tablespoon honey
3 Tablespoons soy sauce
2 Tablespoons sesame oil
vegetable oil
Sofrito.
2 stalks of lemongrass, peel off the outside layer and quickly chop the tender centers of the stalks
2 Fresno red chilies, seeded and deveined
2-3 inches of fresh ginger, peeled and quickly chopped
4 garlic cloves
1 large shallot, quickly chopped
1/4 cup water
2 tablespoons fish sauce
Soup.
1 1/2 tablespoons vegetable oil
1 14.5oz can coconut milk
2 tablespoons creamy peanut butter
1 quart chicken broth
1 tablespoon soy sauce
1 tablespoon brown sugar
1/3 cup lime juice (about 1 1/2 limes)
10oz Udon noodles
Garnish.
1 large shallot, thinly sliced
Cilantro, trimmed
Sesame oil
Directions.
To drain the tofu, wrap it in paper towels, and set it on a plate. Place another plate on top to help press out the water. Let the tofu drain for about an hour. Mix together your honey, soy sauce, and sesame oil to make a marinade for the tofu. After draining for one hour, cut the tofu into 1″ cubes, place in a bowl or dish and pour in the marinade. Gently toss and allow it to sit while you prep all your other ingredients for the soup.
Put all the ingredients for your sofrito in a food processor (lemongrass, chilies, ginger, garlic, water, fish sauce, and shallot) and purée it. Set aside.
In a bowl, gently whisk together all of your soup base ingredients except for the oil (coconut milk, peanut butter, chicken broth, soy sauce, brown sugar, and lime juice). Set aside.
Heat your vegetable oil in a large pot over medium heat. Put in your sofrito and cook it, stirring constantly for a few minutes. Once it smells really fragrant and sweet add in your coconut milk/broth mixture. Bring to a low simmer and cook the soup for 15-20 minutes.
In the meantime, bring another large pot of water to a boil. While you’re waiting for it to come to a boil, heat a large non-stick pan over medium-high heat. Add a bit of vegetable oil to the pan and allow it to heat up. Carefully add your tofu cubes to the pan using a pair of tongs. Sauté the tofu until it’s nice and golden brown on all sides. Transfer the tofu to a plate and set aside.
By now your water should be boiling, toss your Udon noodles in and cook them until they are al dente, then drain them.
Stir the soup well and ladle it into bowls, add in some noodles, top with tofu, cilantro, and the thinly sliced shallot. Drizzle with a tiny bit of sesame oil and serve immediately.
Serves 4.
PRINTABLE RECIPE.
THAI COCONUT SOUP WITH UDON NOODLES AND TOFU
This past September I lost someone very dear to me. Her name is Linda. Linda was a wonderful cross between a mom, grandmother, aunt, advisor, and friend. When you’re raised primarily by a single parent the village that rises up around that parent is so important. Linda and her husband Dave were at the center of that village.
Three Christmas Eve’s ago, Linda was diagnosed with cancer, and this Christmas Eve she won’t be there. Nearly every Christmas Eve our family has gathered with Linda and Dave to celebrate, open gifts, sing carols, eat delicious food, and stuff our faces with Linda’s incredible caramel corn. When my siblings and I were young, it was Linda and Dave who surprised us with the most elaborate and wonderful gifts: a trip to Disneyland for our whole family; a kitten for me, my brother, and sister. I know that gifts aren’t the most important part of Christmas, but it should be noted that Linda was the most thoughtful gift giver and maker. She put so much time and thought and care into the gifts she gave whether it be a literal litter of kittens at Christmas, a handmade knitted blanket in anticipation of Lulu’s birth, or a sewn tooth fairy pillow for Gigi to use when she starts losing teeth.
All of Linda’s gifts were given and made with so much love. The gift we looked most forward to from Linda each year was her caramel corn. When we were kids we got small tins filled with it, as teenagers she gave us empty Red Vines containers packed full of it, and as adults we got lots and lots, not only for ourselves but for our boyfriends, girlfriends, and then husbands and kids. Two Christmas’s ago I went to spend a morning with Linda so she could teach me how to make her beloved caramel corn.
 PINPINPINPINPIN PINPINPINPINPIN
Linda’s Caramel Corn is sweet and salty and crunchy; it can be nibbled at or eaten by the handful. It’s the best caramel corn I’ve ever eaten. I treasure the memory of making it with Linda, and setting out to make it as our Christmas gifts this year will be bittersweet and important.
What a gift that I get to take her with me into this holiday and future Christmas’s with her recipe tradition to carry on. I get to stir the caramel and hear her voice echoing instructions in my ear. I get to clean as I go which is something Linda was a pro at, and something I’m not very good at doing. I get to smell the rich caramel as the popcorn bakes and cools, and keep her in my thoughts all the while. I get to eat a handful of it and taste all those Christmas memories, and I get to miss her. Missing her is a blessing because it means that I got to know her and love her and share some of my happiest memories with her. I get to picture her smile when I give the caramel corn to my brother, sister, husband, brother-in-law, daughters, nephews, and mom. Linda made and and gave her caramel corn with so much love and maybe that’s what made it so delicious; so bringing her love, along with mine into the making of this Christmas’ batches is probably the most important element of making it.
PINPINPIN
This recipe makes a lot of caramel corn, enough to fill three gallon size ziplock bags to the brim. The recipe could be easily cut in half. If you cut it in half still use the full amount of love, there’s no need to reduce that. Happy Holidays to you all.
LINDA’S CARAMEL CORN
Ingredients.
love
2 cups packed light brown sugar
1/2 cup light corn syrup
1/2 pound unsalted butter
1/4 teaspoon cream of tartar
1 teaspoon fine sea salt
1 teaspoon baking soda
6 quarts (about 24 cups) freshly air popped popcorn
Directions.
Preheat the oven to 200ºF.
Combine the brown sugar, corn syrup, butter, cream of tartar and salt in a medium saucepan. Heat to boiling, stirring over medium high heat. Boil rapidly to the hard ball stage (250ºF on a candy thermometer).
Remove from heat, stir in baking soda quickly but thoroughly and pour at once over popped corn in a large roasting pan, stirring and tossing gently as you pour. Stir gently until all kernels are coated with a bit of caramel.
Bake at 200ºF for 1 hour, stirring every 20 minutes.
Carefully, turn the caramel corn out onto a counter covered with sheets of parchment or wax paper. Allow to cool before breaking it up a bit.
PRINTABLE RECIPE.
LINDA’S CARAMEL CORN
When I was a kid, I remember my mom making Rice Crispy Treats when it was time for my twin brother and I to take birthday treats to school. Our birthday is the day before Valentine’s day, so I remember the treats being studded with spicy cinnamon red hots in the muddled shape of hearts. I’m pretty sure that this was in second or third grade because it is coupled together with the memory of my Dad and Stepmom bringing their new dalmatian puppy into our classrooms to celebrate our birthdays in serious style. I’m sure there were years of brownies, cupcakes, and lemon bars, but I only remember the Rice Crispy Treats.
As someone who doesn’t love, or even really like chocolate, I always gravitate towards the caramel, sugar cookie, Rice Crispy Treat side of the dessert table. Rice Crispy Treats seem like such a “kid dessert”. You might go to a friend’s house for dinner and have chocolate soufflé, or a delicious pie or gallette for dessert, but never in my adult life have I had Rice Crispy Treats served to a group of adults. Which sadly means that as an adult you rarely come across a gooey, sticky, sweet tray of Rice Crispy Treats, and that is a real shame. Sure, they’re around at kids’ birthday parties and Halloween parties, but what would be the harm in making up a batch of Rice Crispy Treats to your book club, or to dinner at a friend’s when you’re asked (or volunteer) to make dessert? Nothing! There is no harm in that at all… especially when the Rice Crispy Treats in question are made with rich, nutty, fragrant browned butter, heavenly roasted marshmallows, and a hefty sprinkling of fleur de sel!
PINPINPIN
I started toying around with my “grown up” version of Rice Crispy Treats a couple years ago and I think I’ve gotten down to the exact, perfect recipe. You’d be amazed at how many different ways a recipe with only four ingredients can go, particularly in regards to the Rice Krispies to marshmallow ratio. My neighbors have been the recipients of a heck of a lot of Rice Crispy Treats test batches over the last couple of years!
PIN
I tend to like my Rice Crispy Treats a little more on the gooey side, so I have a more marshmallows to cereal in my recipe, but if you like yours a little firmer you can add an extra 1/2 oz – 1oz of cereal to yours. The key to this recipe is only roasting half of the marshmallows. If you roast them all it changes the consistency of the treats and makes them tough; roasting half gives you that lovely burnt, toasted sugar flavor while the un-roasted marshmallows keep the treats soft and melt-in-your-mouth-y.
PINPINPINPIN
These treats would be a wonderful addition to your holiday gatherings, and I promise they’ll be devoured by kids and grownups alike. They only take about ten minutes to make so they’re perfect for throwing together when you’re oven and stovetop have a full dance card. I also should mention they’re amazing in the morning with a cup of piping hot coffee… and you know how I feel about desserts that double as breakfast! This recipe makes enough for a large 9×13 inch pan, if you cut it in half (which I don’t recommend because you’ll probably regret it) you can use a 9X9 inch pan.
BROWN BUTTER ROASTED MARSHMALLOW SALTED RICE CRISPY TREATS
Ingredients.
9 oz. Rice Krispies cereal (about 8.5 cups)
20 oz. marshmallows
2 sticks unsalted butter, browned
2 tsp fleur de sel (1 1/2 tsp mixed in, 1/2 tsp on top)
non-stick spray
Directions.
Measure out the Rice Krispies cereal, toss it with 1 1/2 teaspoons of fleur de sel, and set it aside.
Spray or lightly butter a 13×9 inch dish.
Line a roasting sheet with parchment paper and spray it with non-stick spray. Spread 1/2 of the marshmallows out in a single layer and place them on the middle rack in a cold oven. Set the other half of the marshmallows aside.
Turn the oven broiler on at 450oF. Keep a close eye on them while you brown your butter. Pull them from the oven as soon as the top layer of the marshmallows is a deep, golden brown. The marshmallows take about 5 minutes to roast.
Place two sticks of butter in a large, heavy bottomed metal pot and melt the butter over medium heat. Once it begins to foam and sizzle reduce the heat to medium-low. The foam will subside leaving you with separated butter. It will look perfectly clear. Continue to stir. The butter will begin to foam up again and will quickly begin to turn a toasty brown color. When it smells amazing and turns a beautiful, deep brown hue, turn off the burner and quickly add in the un-roasted marshmallows and stir to melt them into the butter.
Your roasted marshmallows should be done roasting at this point. Pull them from the oven, carefully pick up the edges of the parchment and slide the marshmallows straight into the pot. Stir until all the marshmallows are totally melted. If needed you can turn the burner to low to add additional heat to help the process along.
Add in the cereal and salt and mix the whole delicious mess together until well combined. Dump it all into the greased dish and using wet hands (or the back of a wet wooden spoon) quickly, carefully, and gently press the hot mixture evenly into the dish. Sprinkle with another half teaspoon of the salt and let cool to room temperature. Once cooled you can serve them immediately or cover them with plastic wrap and they’ll keep for a couple days… but, honestly, you probably won’t have any left for more than 24 hours.
PRINTABLE RECIPE.
BROWN BUTTER ROASTED MARSHMALLOW SALTED RICE CRISPY TREATS
First of all, I wanted say a big thank you to all of you who reached out after my last post. All of your messages were so welcome and warmly received. I send love back to all of you, especially to those of you who shared your own stories of loss with me. I’ve been slowly but surely finding my way back into myself, one slow, quiet day at at time. I recently came across a beautiful poem by Pablo Neruda that I’ve been thinking of often:
“The days aren’t discarded or collected, they are bees
that burned with sweetness or maddened
the sting: the struggle continues,
the journeys go and come between honey and pain.
No, the net of years doesn’t unweave: there is no net.
They don’t fall drop by drop from a river: there is no river.
Sleep doesn’t divide life into halves,
or action, or silence, or honor:
life is like a stone, a single motion,
a lonesome bonfire reflected on the leaves,
an arrow, only one, slow or swift, a metal
that climbs or descends burning in your bones.”
So I’ve just been living in the middle, with things neither great, nor terrible, and I have to tell you, it feels pretty good. As hoped for, October was really peaceful. I’ve been focusing on getting our home back in order as we spent most of August and September turning it inside out in order to move the girls into a shared bedroom. We have been spending a lot of days unapologetically home in our sweat pants, going for small outings to visit friends, pick up loads of books from the library, and short jaunts to the grocery store to get ingredients for dinners.
Our meals have stayed pretty basic: risotto, soups, roasted vegetables, ramen, fresh pasta, roasted chickens but I’ve been really enjoying my time in the kitchen again, which is no small thing. I almost always have at least one of my kids under my feet, standing next to me on a step stool, or literally clutching onto the tails of my apron begging for tastes of Parmesan cheese, thin rounds of carrots, or dipping their fingers in mayonnaise and dressings. Often it’s both of the girls together bickering over who gets to dump the ingredients into the food processor, and who got to push the pulse button more times.
Lulu has been my big kitchen “helper” lately. She loves mixing things together and it’s a great way of letting her get familiar with the ingredients that will end up on her plate. She’s not a big dinner eater, often deciding that she “doesn’t prefer” her dinner and asking to be excused barely having taken a bite. However nonchalant she feels about eating, she loves cooking with me, and I happily embrace that.
One meal that is happily devoured by everyone at our dinner table, Lulu included, is simple, satisfying Chicken Noodle Soup. There’s no clever twist on my recipe and you could probably search the Internet and find a dozen similar recipes. It is basic, rich, fortifying, and wonderfully simple. The key to this recipe is using homemade stock, nothing quite compares to it. If you have the day to while away you could make the stock the same day, if not you could use previously made stock, saving the chicken soup bones and ends to make a whole new stock for the next round of soup.
PIN
I usually start with either the leftovers from the previous night’s roasted chicken, or roasted chicken breasts. For the roasted chicken breasts I simply place 2-4 large bone-in, skin-on chicken breasts on a roasting sheet, drizzle them with olive oil, season them with kosher salt and freshly ground black pepper and place them in a 375º oven for about 35-45 minutes, until their internal temperature registers 160-165º F. I remove them from the oven and allow them to cool before removing the skin, peeling the meat from the bones and shredding it with a fork (reserving the skin and bones for stock). You really only need two roasted breasts for this recipe, but I always roast four and use the others for enchiladas, salads, mac and cheese, etc.
PIN
Other than using homemade stock their’s no real secret to this recipe, it’s important to add the ingredients in careful order so that nothing becomes overcooked, season as you go, and I’m a big believer in cooking the pasta on it’s own before adding it to the individual bowls of soup. I don’t like the starch that pasta adds to the soup when the noodles are cooking in the soup itself, and I can’t handle the mushy, swollen bites of pasta in my leftover soup. It’s worth bringing a separate, heavily salted pot of water to a boil and cooking the pasta al dente. I love to serve this soup with my garlic bread.
PIN
CHICKEN NOODLE SOUP
Ingredients.
leftovers from 1 whole roasted chicken or two whole roasted chicken breast, shredded
6 cups chicken stock
1 large yellow onion, diced
1 large carrot, sliced
2 celery stalks, sliced
2 cloves garlic, minced
1 bay leaf
1 teaspoon garlic powder
1 teaspoon onion powder
1/2 teaspoon each: dried oregano, dried parsley, dried thyme
1 pinch each: nutmeg, paprika
1lb bow tie or penne pasta
1 tablespoon extra virgin olive oil
kosher salt
freshly ground black pepper
Directions.
In a large dutch oven, heat the olive oil over medium heat, add the onion. Sauté until the onion is translucent and just begins to brown around the edges, about 5-7 minutes. Add in the garlic, carrots, celery, herbs, nutmeg, and paprika. Sauté for another couple of minutes before adding the broth and chicken. Bring the soup up to a nice, gentle simmer. Season to taste with salt and pepper. Discard the bay leaf.
Bring a large pot of salted water to a boil. Cook about 1/2 cup of pasta per person until al dente. Drain the pasta and add a bit to each bowl before topping off the bowl with the hot soup. Mix gently together and enjoy.
PRINTABLE RECIPE.
CHICKEN NOODLE SOUP
September is usually my favorite month, I usually love everything about it. I love the slow slide from summer into fall; the crisp cool mornings and warm afternoons; the pull to open bottles of red wine. I look forward to September all summer, but this year I was not at all sorry to rip the September page off of our calendar. I’ve hesitated to share more, but what I’ve experienced are universal experiences; experiences that many of you have been through or might go through someday. Beyond that, I don’t know how to write without being honest and transparent.
At the end of August I got two pieces of sad news: at my eight week ultrasound I learned that my pregnancy wasn’t viable, and someone very dear to me, a wonderful woman named Linda, would be passing away. The first two weeks of September passed in a strange blur of anxious anticipation, denial, and grief. I was able to get to Seattle to say goodbye to Linda, and I’m so grateful for that. I’m also incredibly grateful to have friends who don’t point out how sick and sad and tired you look, but instead literally offer you a shoulder to cry on. I had a miscarriage in the middle of the month, in my tenth week of the pregnancy. A week later Linda passed away.
We just got home from a trip to Seattle to celebrate Linda’s life, and we managed to have some much needed fun with our family and friends. I am ready for a really peaceful, cozy, quiet fall. I’m working on my own, with Kyle’s unwavering love and support, and with a counselor to let all of the stress and anxiety of the last month melt away, to experience and process the grief that comes with loss, and I’m slowly getting back on my feet physically and emotionally. I haven’t been cooking too much, mostly reverting to comfort food basics.
I recently went for an acupuncture appointment with a woman I’ve known and seen for years. She asked me, “Are you eating well? I know you know how to cook.” I know that what she meant was that I know about nutrition; I understand what’s good for me, and what’s not. But what I heard her ask was, “Are you nourishing yourself?” Feeding ourselves is about so much more than our ability to take food from our oven and put it on our table and into our bodies. Appetite is about more than our basic need for calories.
I’ve been thinking a lot about what I come here to write about, and when it comes down to it it’s less to do with the recipes than it is to do with the way our stories and lives intersect with food and nourishment. We all have our own ways of showing love, and mine, in a big way is through food; through nourishing the people I love. Food is an incredible way to transmit love. I know how to cook, to feed, to nourish others, but nourishing myself is something I am slowly learning to do more of… and something I certainly need a lot of right now.
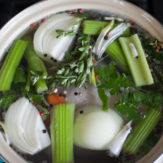
I think it’s fitting that the first things I’ve cooked since getting back up on my feet are roasted chicken, ramen with tofu, chicken and dumplings, and chicken noodle soup. These all start with the same base: chicken stock. At first I was pulling stock from the freezer, but then I started making it again. Stock is the most basic thing, it takes very little effort and energy to make, but the end result is something that is fortifying, comforting, and nourishing. It is also the type of cooking that leads to more cooking because stock is only one ingredient in a meal. Once the stock is made you have to ask yourself, “What do I want to make with this?” Making stock is the first step in creating a nourishing meal.
I approach making stock in two different ways: sometimes I find whole chickens on sale and the price is worth making stock from the whole bird; most of the time I make stock from the bones and leftovers from a roasted chicken dinner. I also use a mix of whole vegetables and vegetable scraps. Throughout the week I keep a sealed container in the refrigerator for all of those vegetable scraps: carrot peels and ends, tops and bottoms and peels of onions, the base of the celery stalks, the woody ends of garlic cloves, the stems from a bunch of parsley, etc. When it comes time to make stock I add those to pot along with an addition chopped up carrot, celery stalk, or roughly chopped onion if needed. Sometimes I accumulate enough over the course of the week that I don’t need to add any additional vegetables. I also add in a handful of fresh herbs like parsley, rosemary, thyme, and sometimes sage or oregano, depending on what’s plentiful in the garden. A bay leaf and a palmful of peppercorns round out the stock.
PIN
All of these vegetables are added to a pot with the whole chicken, or the chicken backbone, bones, and leftover meat. The lot is covered with cold water and simmered on the stove for hours. The result is something far beyond what you can ever buy in a can or box of store-bought stock; it’s like the difference between a Bud Light and a craft beer. Homemade broth is rich, gelatinous, and incredibly flavorful. I’m presenting you with both versions of my stock: the version made with whole, uncooked chicken, and the version made from leftovers.
PINPIN
CHICKEN STOCK (TWO VERSIONS)
For both of the following recipes you can use whole vegetables, scraps of vegetables, or a combination of the two. For ease I’ve just listed the amount of whole vegetables I use, along with the fresh herbs and seasonings. In the winter I’ll use dried herbs, usually about a 1 teaspoon each of parsley, thyme, and rosemary. The broth can be used right away, refrigerated for up to a week, or frozen in a large Ziplock bag for up to three month… if you wanted to be really organized you could measure the stock out into quarts and freeze it. Most recipes call for broth measured by quarts. On a side note: I know some folks who make their stock in a slow cooker, leaving it to do it’s work while they are at work themselves. I don’t own a slow cooker and have actually never used on, so I can’t attest to this. But if staying home while your stock simmers isn’t an option, you might give it a try.
Chicken Stock (from a whole, uncooked chicken)
Ingredients.
5-6 qts cold water
1 whole 4-5lb. chicken
3 carrots, very roughly chopped
3 celery stalks, very roughly chopped
1 large onion, very roughly chopped
3 whole garlic cloves, left whole or gently smashed
1 bay leaf
large handful any combination of fresh herbs: thyme, rosemary, oregano, parsley, sage
1 tablespoon whole peppercorns
kosher salt
Directions.
Wash the chicken by scrubbing it well with kosher salt inside and out. Rinse it well and place it in the bottom of a stock pot (or a large pot with a lid). Add in all the vegetables/ vegetable scraps, herbs, bay leaf, and peppercorns. Season well with salt.
Fill the pot with cold water. Bring it to a boil and simmer vigorously for 10 minutes. Turn off the heat and let it settle. Using a large soon scrape the foam from the top of the pot and discard it. Bring the stock back to a simmer, cover, reduce the heat and simmer very low for at least four hours, adding water as needed. If I’m home I’ll let it simmer for up to eight hours.
Turn of the heat, remove the lid and allow the stock to cool. Season to taste with additional salt. Once it’s cool, pour it through a fine mesh strainer into another pot, discard the chicken and vegetables. Chill the stock completely in the refrigerator, then skim the layer of fat from the top of the stock and discard it. Put the stock in a sealed container and refrigerate, or freeze it.
Chicken Stock (from leftovers)
This first version is made from chicken leftovers. This is a great way to get quite a few meals out of one bird, and the way I make chicken stock most of the time. Most often when I roast chicken I cut out the backbone to speed up cooking time, I simply add this
to my container of vegetable scraps and use it the next day along with the neck (usually tucked into the bird cavity when it’s butchered), the chicken carcass and bones, and any leftover chicken meat that we didn’t eat. I find that this stock is just as delicious as stock made from a whole bird. Sometimes it even has more flavor since the chicken has been seasoned and roasted along with herbs and lemons. Yet another approach is to roast four bone in, skin on chicken breasts. I simply season the breasts with olive oil, salt and pepper and roast them at 375oF on a baking sheet for about 30-45 minutes depending on the size of the breast. They should register 165o-170oF. Then I let them cool, remove the skin and pull the meat from the bones. Use the meat for meals and the skin and bones for broth.
Ingredients.
5-6 qts cold water
1 whole chicken carcass, neck, backbone, etc., or the bones and skin from 4 roasted chicken breasts (see recipe notes above)
3 carrots, very roughly chopped
3 celery stalks, very roughly chopped
1 large onion, very roughly chopped
3 whole garlic cloves, left whole or gently smashed
1 bay leaf
large handful any combination of fresh herbs: thyme, rosemary, oregano, parsley, sage
1 tablespoon whole peppercorns
kosher salt
Directions.
Place all your chicken scraps in the bottom of a stock pot (or a large pot with a lid). Add in all the vegetables/vegetable scraps, herbs, bay leaf, and peppercorns. Season well with salt.
Fill the pot with cold water. Bring it to a boil and simmer vigorously for 10 minutes. Turn off the heat and let it settle. Using a large soon scrape the foam from the top of the pot and discard it. If you’re making your stock from leftovers you won’t have much foam accumulate. Bring the stock back to a simmer, cover, reduce the heat and simmer very low for at least four hours, adding water as needed. If I’m home I’ll let it simmer for up to eight hours.
Turn of the heat, remove the lid and allow the stock to cool. Season to taste with additional salt. Once it’s cool, pour it through a fine mesh strainer into another pot, discard the chicken and vegetables. Chill the stock completely in the refrigerator, then skim the layer of fat from the top of the stock and discard it. Put the stock in a sealed container and refrigerate, or freeze it.
|


.png)


Jess Kenny - Hi Kacie,
I just wanted to take a moment to commend you for sharing such a beautiful story, albeit a very painful one. I noticed that there were no comments as of yet and I thought I would just say that I am reading your blog, I love it and have noticed your absence of late.. I have made a number of your recipes for my family here in Australia and your posts on table manners/eating for toddlers were excellent! I read them just as my oldest daughter was starting to feed herself and we were able to set our expectations and teach her accordingly.. Thank you!
I hope 2016 is a much better year for yourself and your family..
Kindest Regards,
Jess xx