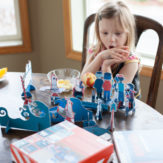
Gigi’s birthday was two weeks ago, although it seems like it was just last week. Now that she’s three years old she is sleeping without Pull-Ups during naps, being a stellar big sister to Baby Lu, and she started drawing circle people. I love her crazy little circle people… you know the ones: circle, four (or sometimes “eleventeen”) lines representing limbs, some eyes, maybe an eyebrow. She’s also been helping me cook and taking more of a part in menu planning, which is really fun.
For her birthday dinner I decided to let her browse through some of my cookbooks and pick whatever she wanted for dinner. She looked through My Father’s Daughter and Tyler’s Ultimate which both have lovely pictures for her to look at. She looked and looked, taking forever to choose in the way only a toddler can make a single decision last forever. Finally she looked up from the books, abandoning them, and said, “I want Ratatouille and that Garlic Bread!” She was referring to my “World-Famous” Garlic Bread and my version of Ratatouille, which is roasted rather than cooked on the stovetop.
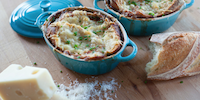
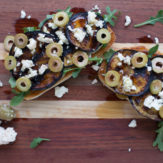
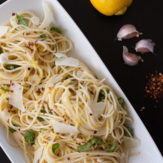
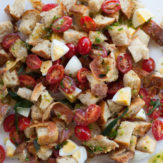
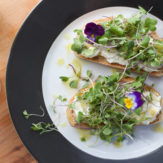
We have been watching Ratatouille a lot and making it fairly often around here lately. It’s perfect to make during a lazy Sunday, and we use the leftovers for lunches for a couple of days. My favorite way to serve it is to take some chewy, springy bread, drizzled with fruity olive oil, pop it under the broiler for a few minutes until it’s golden and crisp, smear the warm bread with a bit of tart goat cheese and top it with the warm, or room temperature Ratatouille and some freshly torn basil. G prefers hers served alongside some pasta that’s been tossed with a bit of pasta water and goat cheese until the goat cheese goats the pasta like an alfredo sauce. For her birthday we chose Linguini pasta since the main characters name in Ratatouille is Linguini.
As soon as Kyle got home from work on New Year’s Eve, G and I hopped in the car and headed to the store. I let her bring her “copping shop”, also known as a shopping cart to those of us with more developed language skills, that she had been given by her Grandparents for Christmas.* I don’t recommend brining your child, who’s high on birthday fumes and wearing a tiara and sash, to the grocery store with their own cart. I’m pretty sure she thought she was on SuperMarket Sweep. Somehow we made it through our shopping trip and got home without either of us getting arrested, or getting stitches, which at times felt like real possibilities.
Once we were home G cozied up on the couch to watch Ratatouille, and I set about making dinner. I roast the vegetables in “layers”, letting each one cook and caramelize before adding the next one so it takes a little while. While it roasted Kyle and I let G open a couple of gifts, sipped our glasses of wine and watched Ratatouille with her. I hope that, as she continues to grow up, she remembers choosing menu items, helping to cook, and that dinnertime was something special in her house… it’s something special to me.
Ingredients.
1 pound eggplant (2 large or 3 medium eggplants) cut into 1-2” pieces
3 zucchinis, sliced into 1” half moons
2 pints cherry tomatoes, cut in half
4 cloves garlic, peeled and thinly sliced
2 medium yellow onions, cut into 2” chunks
1 anchovy filet, smashed with a fork or 1/2 teaspoon anchovy paste (optional)
1/4-1/2 teaspoon red pepper flakes (optional)
5 sprigs fresh thyme
1 bay leaf very small sprig fresh rosemary, finely minced
1 tablespoon tomato paste
3/4 cup extra virgin olive oil
about 3/4 teaspoon
kosher salt
freshly ground black pepper
fresh basil, roughly torn
Directions.
Preheat your oven to 425º F. Place all the sliced eggplant and zucchini on a large roasting sheet, toss them with 1/4 cup olive oil, 1/2 teaspoon of salt, and black pepper. Roast for 45 minutes.
In a small bowl, toss the onion pieces with a bit of olive oil, salt and pepper. Remove the eggplant and zucchini from the oven and add the onions, bay leaf, thyme and rosemary to the roasting pan, tossing the vegetables together gently with the herbs and return to the oven for 30 minutes. Toss together the tomatoes, garlic, anchovy filet or paste, tomato paste, a bit of olive oil, red pepper flakes, a pinch of salt and some pepper together in a bowl.
Remove the vegetables from the oven, add the tomatoes, garlic, etc. to the roasting pan, toss gently and return to the often for another 30-45 minutes, until the tomatoes have softened and the ratatouille is nice and caramelized. Remove from the oven and allow it to rest on the baking sheet for about 20 minutes. Discard the bay leaf and thyme stems.
Serve with bread that’s been drizzled with a bit of olive oil, toasted under the broiler and smeared with goat cheese. Alternatively, prepare some pasta, reserve a bit of the pasta water, and toss the pasta, a couple tablespoons of pasta water at a time, and a few ounces of goat cheese all together until the cheese melts and sticks to the pasta. Top the toast or pasta with the ratatouille, sprinkle with a bit of roughly torn basil and dig in.
*This Melissa & Doug Metal Shopping cart was a serious upgrade from her little plastic one. It’s awesome and she uses it all the time. It’s a quality kids’ toy, and brilliantly, it has breaks built in so if your child climbs in (or more likely shoves there baby sister into it) it won’t move. G loves to use it when it’s clean up time, she loads all her toys in it and carts them where they need to go. It helps make pick up time less of a battle.
When I was a little, we spent every Christmas Day at my Grandma and Grandpa’s house. My Grandparents’ house was always warm and cozy, and always smelled slightly smokey due to the firelplace and woodfire stove. The house seemed huge to me, the Christmas tree was always over-lit with hundreds of white lights. My Grandma made Christmas elegant; she was an elegant lady. Their little kitchen island always boasted an array of snacks and treats… Almond Roca, my Grandma’s caramels, cookies from Grandpa’s favorite bakery. Come to think of it, I’m sure there were savory snacks as well but I inherited my Grandpa’s sweet tooth so I only had eyes for things dusted with powdered sugar.
There was always a nice Christmas dinner, usually consisting of a roast (expect for when I was a vegetarian and my well-intentioned Grandma made a ham, “Honey, I know you don’t eat meat so I made you a ham.”), a green salad with Grandma’s ketchup-and-vinegar dressing, and various classic sides. Dinner was lovely but I couldn’t wait for dessert, more specifically for Grandpa’s “famous” apple pie.
Grandpa’s pie was tart and sweet, with apples sliced so thinly they practically melted in your mouth. Their oven was old, electric, and very small, and the bottom of his pies were always coated with a thin crust of caramel, something I haven’t been able to replicate despite years of trying. His crust is rolled so thin you can see through it, using only one pie crust recipe for two pies. My Grandpa just turned 92 and he still sends me recipes, and we talk about all things baking: crusts, pies, tarts… he is my favorite resource.
When I was a teenager, I called him and asked him if he would teach me how to make his spectacular pies. He obliged and we spent a day in the kitchen together. Everything my Grandpa does is done with precision. He was methodical and specific. He peeled the apples with a small paring knife, the slices were 2mm thick, the flour sifted perfectly. His pies were not glamorous, the tops were often patched up, with perfunctory vents. He used a fork to crimp the edges, then rolled the sides in to prevent the juices from making a mess in the oven. Practicality trumps beauty in his book… which is ironic since my Grandma was just the opposite.
I remember thinking that I would never be able to make them quite as good as he does, and I think that’s true, but I love making them nonetheless. I love this time of year when I can go to the store and load up on apples, and set about baking pies. Gigi is now old enough to (kind of) help me make them. We recently pulled on our aprons and got down to business making Great Grandpa’s Apple Pies. It means so much to me to be making them with Gigi, even if she’s mostly just making a mess.
Ingredients for Pie Crust.
1 1/3 cup cake flour
1 cup all-purpose flour, plus more for rolling surface
1 stick very cold butter, cut into slices
1 tsp fine salt
ice water
Ingredients for Pie Filling.
3 1/2 lbs Granny Smith Apples, once peeled and cored you should have about 2lbs
1 -1 1/3 cup sugar, depending on tartness of apples
1/4 cup lemon juice, freshly squeezed
1 tsp ground nutmeg
1-2 tsp ground cinnamon, depending on how much spice you prefer
1 tbsp butter
2 tbsp all-purpose flour
1 tbsp milk
Directions.
First, peel and core the apples, then set them aside in a large bowl of water to keep them from browning.
To make the crust, place the cake flour, all-purpose flour, and salt in a food processor. Pulse to combine. Scatter in the slices of butter, then pulse again until the butter is well combined. Slowly, with the food processor running, drizzle in the ice water. You want to take your time adding a little water at a time until the dough just forms a ball. Transfer the dough to a ziploc bag and set in the fridge while you slice the apples.
Drain the water from the bowl holding the apples. Using a 2mm or 4mm blade (the standard size that comes with most food processors is 4mm) slice all of the apples, in batches if necessary. Return the apples to the large bowl, toss with the lemon juice.
Preheat your oven to 450º F.
Sprinkle 1 teaspoon of sugar into the bottom of your pie dish. Remove your dough from the fridge. Separate 1/3 of the dough and put it back in the bag, and set aside. Working with 2/3 of the dough, roll it into a ball, on a well floured surface, roll out the dough until it will fit your pie pan, or it reaches your desired thickness. I prefer mine really thin. Transfer the bottom crust to your pie dish. Use a fork to poke a few holes in the bottom pie crust.
Start assembling your pie filling by evenly distributing the following in layers:
2/3 cup sugar
1/3 of the nutmeg and cinnamon sift
1 tbsp flour to cover the cinnamon
1/2 of the sliced apples, take your time and pack them in as tightly as you can
1/3 cup sugar
1/3 of the nutmeg and cinnamon
sift 1 tbsp flour to cover the cinnamon
the rest of the apples the rest of the nutmeg and cinnamon
dot with 1 tbsp butter
Form the remaining 1/3 of your pie dough into a ball. Working on a floured surface, roll out the top crust.
Using your fingertip, dab milk around the outside rim of the bottom pie crust before transferring the top crust to the pie. Press to seal the edges, trim the excess crust, and use a fork or crimp to finish the edges.
Use a sharp knife to cut vents in the top crust, creating whatever kid of design you like.
Place the pie on a baking sheet bake in the center of the oven at 450ºF for 15 mins, reduce heat to 350ºF for another 25-35mins, until the apples have no resistance when a skewer is inserted through one of the air vents.
Transfer the pie to a wire rack, allow it to cool for 1 hour before serving it with vanilla ice cream, or fresh whipped cream.
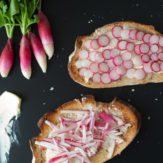
The other night I made Caramelized Fennel, a recipe from Plenty. It was delicious, sweet, crunchy… I may have licked my plate. It’s a beautiful dish: the fennel is sliced into fans, seared in hot butter, and caramelized along with fennel seeds, until it’s a deep, rich brown. I put it on the table, served it up for all of us and without hesitation, Gigi gobbled it up. When Kyle and I were getting ready for bed that night I remarked how proud I was of her. She’s eaten fennel plenty of times but I love that she has learned to trust that what we put on her plate is good, even if it’s a very “adult” dish like the caramelized fennel. I realized it’s been a year since we began our French Kids Eat Everythingapproach to feeding our family, and she’s come such a long way. She loves kale, broccoli, radishes, pine nuts, spinach, squash. It’s taken a ton of work but it’s been so worth it, and I’m so proud of her.
We had a big dinner recently with lots of friends and their kids. It was a fun, busy dinner. G chose to eat her dinner with the grownups, and when she was done, she asked to be excused. It made me feel like the method was really working because, essentially, we are asking her to eat like an adult. I was so proud of her in that moment because she really surprised me. Expecting her to eat like an adult when we are eating dinner together as a family is a lot easier to do than when we are out at dinner, eating at a friends house, or have a house full of people.
For the most part she does eat like an adult (except for when she occasionally uses her fork as a magic wand, pretends to be a pirate at the table or eats broccoli like the cookie monster). We have worked so hard, and asked so much of her, and she has risen to the occasion as kids do when you raise your expectations. Here we are, a year later, and slowly but surely she has come to eat the way we do. The consistency is the hard work, but the trust aspect of the process is the most rewarding part. I really can’t express how proud I am of our girl… and of us, really. It’s been a whole family project. Next week, Baby Lu will join the fray. A whole new adventure.
I’m really proud of G when she follows the very strict rules we have set up for her around everything to do with food. We are in no way perfect, have many off days and failed meals, but overall she has really risen to meet our expectations and for that I’m really proud. I’m proud of her, and proud of us for sticking with it.
*I offended a couple of people with the way the post was previously written. I did not intend for it to appear that I was comparing G to any other children. I’ve changed it to accurately express my feelings. I sincerely apologize if I hurt anyone’s feelings.
I wrote a guest post for What To Expect about our choice to use/success with this method, you can read it here.
These chocolate chip cookies are always close at hand in our house… and have been since I was a child. If you want to, you can read about them and print the recipe here. Enjoy this little cooking video that Gigi and made…
So, here I am, at the beginning… not entirely sure where, or how to begin, a little nervous (in fact I’ve been avoiding my computer for a few days). But, here I am. Both the girls are napping, the house is quiet, the cat has me pinned to my chair, so I can’t avoid “the beginning” anymore.
I suppose the best place to start is with a little background. I grew up near Seattle, Washington. I lived with my mom, older sister, and twin brother in a little, blue, one-level house on the bottom of “the whoop-dee-doo hill” (which, sadly, we rarely got to whoop-dee-doo because we always had stop and turn into our driveway). My mom was a full-time teacher and a single mom to the three of us. I don’t remember much in the way of her cooking, which probably isn’t surprising since I can’t image the thought and effort it took to get anything on the table for us after work and tae-kwon-do and gymnastics and swim team. I do remember “swimming chicken” which we regularly had after swim class, homemade almond milk frozen until slushy, sticky-sweet mochi warm and drizzled with honey, and I remember that unfortunate year we were all allergy tested and had quite a lot of soy ice cream. Mostly, I remember chocolate chip cookies.
My mom, sister and I made cookies together often. I can’t remember if we made the recipe on the Tollhouse chocolate chip bag or another, but we made a lot of cookies in that little blue house. We would get out the “cookie spoon” and the big, heavy bowl and set to work. The specific memories are a bit vague but I remember my childhood, and teenage years dotted by batches of cookies. My sister and I both make chocolate chip cookies every other month or so. Usually, during one of our daily or twice daily phone calls, one of us will mention that we made cookies and it’s a little contagious, cookie baking. We used to team up to bake them when we babysat together, which sometimes resulted in huge, disastrous messes. So whenever she makes cookies, I feel compelled to get out the old cookie spoon, which ended up in my possession, and whip up a batch.
Over the last 25 years of cookie baking, the first half of which Tollhouse was my guide, I have slowly developed my own recipe. A little extra vanilla, perfectly creamed butter and sugar… I always have cookie dough balls in the freezer, ready to pop in the oven at a moments notice. I love making them with Gigi, and soon Lulu will join the fray. There’s something truly fantastic about watching a two and half year old eat a chocolate chip cookie. Gigi dunks it in her milk and practically slurps it down, then, when she gets to the last little chunk of cookie, she plunks it into her glass of milk, then tips the cup back drinking the last of the milk and the last of the cookie in one enthusiastic go. I admire her technique.
Baking cookies with Gigi makes me feel so wonderful… cozy, confident, very mom-like. In some ways it feels like chocolate chip cookies are the only tradition passed down from my mom to us girls and, if nothing else, my girls will know how to bake chocolate chip cookies when it’s all said and done.
Dry Ingredients.
2 1/4 cups flour
1 teaspoon fine salt
1 teaspoon baking soda
1 tiny pinch of freshly shaved nutmeg, optional
2 cups semi-sweet chocolate chocolate chips
Wet Ingredients:.
2 large eggs (at room temperature)
1 cup (2 sticks) butter, softened to room temperature
3/4 cup granulated sugar
3/4 cup firmly packed light brown sugar
2 teaspoons pure vanilla extract
Directions.
Preheat the oven 350 degrees. Sift the flour, salt, and baking soda together in a small bowl. In a separate bowl, cream together the sugars and the butter, then add in the vanilla. Whisk the eggs in another small bowl before adding them to the creamed sugar mixture. Once this is all mixed together, slowly sprinkle in the flour and mix until it’s incorporated. Mix in the chocolate chips.
Using a spoon, scoop up some dough and roll it into a ball in the palm of your hand. Place it on a baking sheet. Continue making your dough balls until you have them spaced out (about 2-3 inches apart) on your cookie sheet.
Bake for 9-11 minutes, until golden brown on the outside and light brown in the middle. If the cookies are frozen* they will need to be baked 12-14 minutes. Enjoy!
*I usually bake up one sheet and cover a separate cookie sheet with cookie dough balls and slide in in the freezer for fresh baked cookies whenever I want. Once they are frozen and won’t stick together I put them all into the resealable bag.


.jpg)
.jpg)
.jpg)
.jpg)
.jpg)
.jpg)
.jpg)
.jpg)
.jpg)
.jpg)
.jpg)
.jpg)
.jpg)
.jpg)
.jpg)
.png)